BloodHound CE for Defensive AD Analysis: Attack Path Management
Mon Jun 29 2026 · 19 min read
Category: Security Research
Introduction: Using the Attacker's Map for Defense
When Andy Robbins, Rohan Vazarkar, and Will Schroeder unveiled BloodHound at DEF CON 2016, the audience reaction was mixed: red teamers were elated, while many system administrators struggled to grasp how dangerous it truly was. BloodHound modeled Active Directory relationships in a graph database and calculated the shortest attack paths across that graph. An attacker with any standard domain user account could automatically find the path to Domain Admin.
Today the picture is different. SpecterOps transformed BloodHound into the foundation of Attack Path Management (APM): no longer just a reconnaissance weapon for attackers, but a defensive platform that blue teams use to continuously measure their AD security posture. BloodHound Community Edition (CE) is the free, open-source implementation of this next-generation approach.
In this post we examine BloodHound CE from a strictly defensive perspective — from installation and collection methodology to tier model implementation, custom Cypher queries, attack path prioritization, and systematic remediation workflows. The goal is to see your Active Directory environment through an attacker's eyes and close critical security gaps before they are exploited.
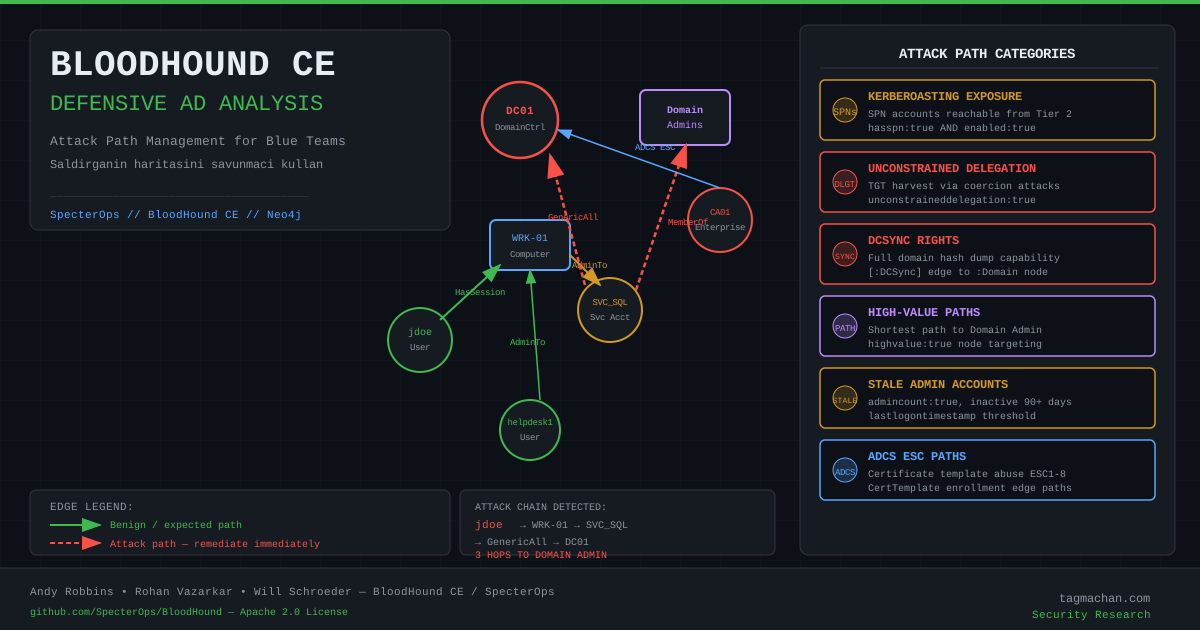
BloodHound CE vs. Legacy BloodHound: What Changed?
BloodHound has evolved into three distinct products. Understanding the differences is essential for choosing the right tool.
Legacy BloodHound (v4 and earlier)
The original BloodHound was an Electron-based desktop application. Single-user, with Neo4j running locally. Installation was painful, especially on non-Windows platforms. While still functional for certain use cases, it is no longer recommended for enterprise environments.
BloodHound CE (Community Edition — v5+)
Modern BloodHound was completely rewritten. It ships with a React-based web UI, services that spin up in seconds via Docker Compose, multi-user access with RBAC, a REST API, and two database layers (PostgreSQL + Neo4j). One command to install, access from any browser. BloodHound CE is distributed on GitHub under the Apache 2.0 license.
BloodHound Enterprise (BHE)
SpecterOps's commercial product. Everything in CE plus continuous Attack Path Management, automated reporting, tenant-based multi-forest support, Tier Zero asset management, and SIEM integrations. Designed for large enterprises; pricing is license-based.
SharpHound vs BloodHound.py: The Collectors
- SharpHound (.NET): The official collector. Runs from Windows, does not require a domain-joined machine (can be used remotely), produces the most comprehensive dataset. Supports all collection methods: ACL, Session, LoggedOn, ObjectProps, Trusts, Container, CertServices, GPOLocalGroup.
- BloodHound.py (Python): Community-supported, runs on Linux/macOS. Requires only network access and valid domain credentials — no domain-joined machine needed. Works over LDAP+Kerberos. Some collection methods are absent or slower than SharpHound.
BloodHound CE Installation
Docker Compose is the fastest path to BloodHound CE. In production environments, use a dedicated analysis machine (jump host or secure workstation).
# Single-command installation — requires Docker and Docker Compose
curl -L https://ghst.ly/getbhce | docker compose -f - up

# Run in background
curl -L https://ghst.ly/getbhce | docker compose -f - up -d

# Default URL: http://localhost:8080
# Initial login password shown in Docker logs:
docker logs bloodhound-ce_bloodhound_1 2>&1 | grep "Initial Password"
After installation, BloodHound CE runs three containers:
bloodhound: Main application (Go backend + React frontend)graph-db: Neo4j 4.4 (Cypher query engine)app-db: PostgreSQL (user management, application state)
On first login, change your password and create a reporting service account or API token.
Secure Deployment Notes:
# In production, bind to localhost only instead of 0.0.0.0
# In docker-compose.yml:
# ports:
#   - "127.0.0.1:8080:8080"

# For TLS, place an nginx reverse proxy in front
# Keep the collection endpoint behind VPN during data ingestion
Data Collection with SharpHound
Collection is the foundation of all analysis. Understanding what SharpHound collects and how it operates is critical both for correct analysis and for evaluating the network noise the collection creates.
Core Collection Methods:
# Collect all data (most comprehensive, most noisy)
.\SharpHound.exe -c All --zipfilename corp_bhdata.zip

# Collect from DCs only — much less noisy, faster
.\SharpHound.exe -c DCOnly

# ACL and group data only (no session data)
.\SharpHound.exe -c ACL,Group,ObjectProps,Container

# Session data — which user is logged on to which machine
# Requires local admin rights on targets (over SMB)
.\SharpHound.exe -c Session,LoggedOn --computermaxconn 5

# Target a specific OU (partitioned collection for large environments)
.\SharpHound.exe -c All --searchbase "OU=Workstations,DC=corp,DC=local"

# ADCS data (certificate templates, CAs)
.\SharpHound.exe -c CertServices

# Remote domain collection (from a non-domain-joined machine)
.\SharpHound.exe -c All -d corp.local --ldapusername jdoe --ldappassword 'P@ssw0rd'
# Remote collection from Linux (BloodHound.py)
pip3 install bloodhound
python3 bloodhound.py \
  -u jdoe \
  -p 'Password123' \
  -d corp.local \
  -dc dc01.corp.local \
  -c all \
  --zip \
  --dns-tcp

# With Kerberos authentication (Pass-the-Hash or PKINIT)
python3 bloodhound.py \
  -u jdoe@corp.local \
  --hashes :aad3b435b51404eeaad3b435b51404ee:31d6cfe0d16ae931b73c59d7e0c089c0 \
  -d corp.local \
  -dc dc01.corp.local \
  -c all \
  --zip
Collection Security and Noise Management:
BloodHound collection leaves traces in the domain environment. As a blue team operator running authorized collection, define a maintenance window:
Sessioncollection: Opens SMB connections to each target. Can be detected by IDS/IPS.LoggedOncollection: Requires Remote Registry service — won't work on systems that haven't enabled it.ACLcollection: Works over LDAP, nearly silent. Preferred starting point.- Create a dedicated service account for collection:
svc_bloodhound. Minimum rights: domain user + RemoteRegistry read.
Tier Model: Credential Isolation Architecture
However rich the BloodHound data, it is meaningless without context. That context is the Tier Model — a credential isolation architecture based on Microsoft's ESAE (Enhanced Security Admin Environment) and PAW (Privileged Access Workstations) framework.
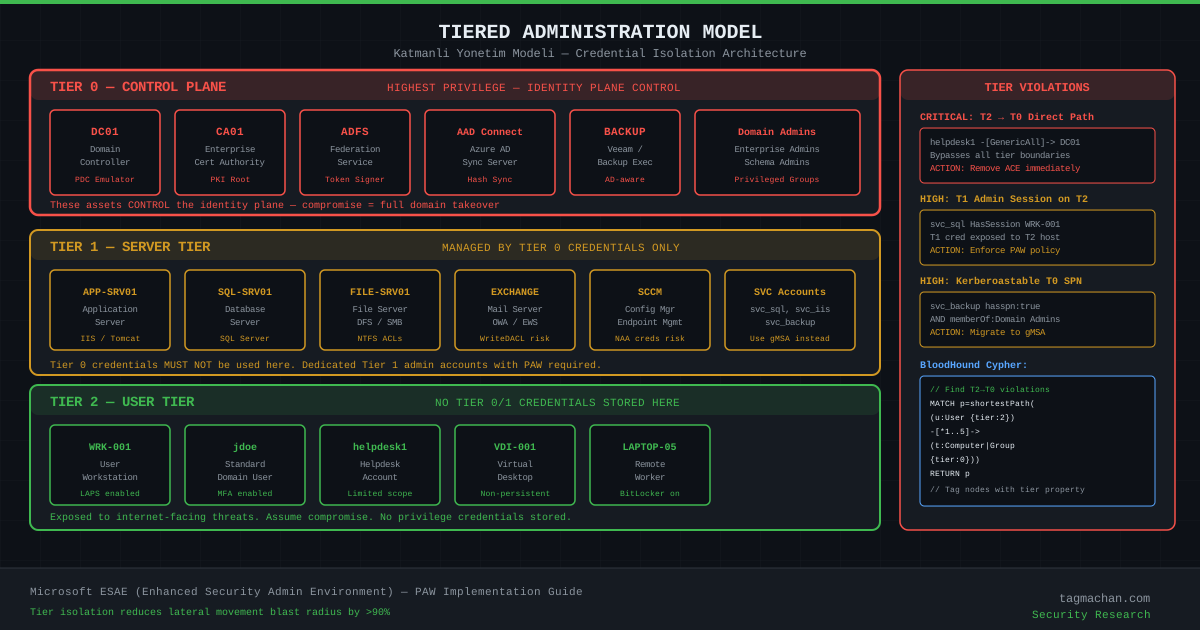
Tier 0 — Control Plane
Tier 0 encompasses assets that control the identity plane. If this tier is compromised, every digital asset in the organization is at risk.
Tier 0 assets:
- Domain Controllers (all DCs, including RODCs)
- Enterprise CA servers (ADCS PKI infrastructure)
- ADFS servers (federation and token signing)
- Azure AD Connect / AAD Sync (identity sync, includes hash sync)
- Backup systems managing Tier 0 (Veeam, Backup Exec — AD-aware)
- Domain Admins, Enterprise Admins, Schema Admins groups
- Tier 0 PAWs (privileged access workstations used to manage these assets)
Tier 1 — Server Tier
Enterprise applications, databases, and infrastructure services. Tier 0 credentials are never used here.
Tier 1 assets:
- Application servers (IIS, Tomcat, JBoss)
- Database servers (SQL Server, Oracle)
- File servers (DFS, SMB shares)
- Exchange / mail servers (Exchange WriteDACL risk is particularly notable)
- SCCM / Intune management servers
- Tier 1 service accounts
Tier 2 — User Tier
The tier most exposed to the internet; primary target for phishing and initial-access attacks.
Tier 2 assets:
- User workstations and laptops
- Virtual desktops (VDI)
- Helpdesk accounts (must be kept within Tier 2 scope)
- Standard domain users
Detecting Tier Violations with BloodHound:
Before implementing the tier model you must detect existing violations. BloodHound is extremely valuable here:
// Any path from a Tier 2 user to a Tier 0 asset
MATCH p=shortestPath(
  (u:User {enabled:true})
  -[*1..8]->
  (t:Computer)
)
WHERE t.name IN ['DC01.CORP.LOCAL', 'CA01.CORP.LOCAL', 'ADFSRV01.CORP.LOCAL']
AND NOT u.name STARTS WITH 'CORP\\DA-'
RETURN u.name, t.name, length(p) as Hops
ORDER BY Hops ASC

// Is a service account a member of Tier 0 groups?
MATCH (u:User)-[:MemberOf*1..]->(g:Group)
WHERE g.name =~ '(?i).*(domain admins|enterprise admins|schema admins).*'
AND u.name =~ '(?i).*(svc_|service_|sa_).*'
RETURN u.name, g.name
Critical Attack Path Categories
BloodHound excels at identifying several critical attack path categories. Here we examine each one — how to detect it and how to remediate it.
1. Kerberoasting Paths
Kerberoasting exploits accounts with registered SPNs (Service Principal Names) by requesting and offline-cracking their TGS tickets. Queried in BloodHound via the hasspn:true property.
Risk factors:
- Account has
admincount:true— direct Domain Admin path - Password last changed date is old — higher probability of weak password
- RC4 encryption is supported — cracked very quickly by modern GPUs
- Account last logon date is old — orphaned account
// Kerberoastable accounts and their distance to DA
MATCH (u:User {hasspn:true, enabled:true})
OPTIONAL MATCH p=shortestPath(
  (u)-[*1..10]->
  (g:Group {name:"DOMAIN ADMINS@CORP.LOCAL"})
)
RETURN u.name,
       u.serviceprincipalnames,
       u.pwdlastset,
       u.admincount,
       length(p) as HopsToDA
ORDER BY HopsToDA ASC NULLS LAST

// High-value Kerberoastable accounts (on path to DA)
MATCH (u:User {hasspn:true, enabled:true, admincount:true})
RETURN u.name,
       u.serviceprincipalnames,
       datetime({epochSeconds: toInteger(u.pwdlastset)}) as PasswordLastSet
Remediation priorities:
- All Kerberoastable admin accounts → replace with gMSA (Group Managed Service Account)
- If gMSA is not possible: enforce AES256 encryption, 25+ character password, 180-day rotation
- Add account to Protected Users group (removes RC4, shortens TGS lifetime)
2. AS-REP Roasting
Accounts with Kerberos pre-authentication disabled can receive an encrypted response without any authentication — that response can be cracked offline.
// AS-REP Roastable accounts and impact analysis
MATCH (u:User {dontreqpreauth:true, enabled:true})
OPTIONAL MATCH p=shortestPath(
  (u)-[*1..10]->
  (g:Group {name:"DOMAIN ADMINS@CORP.LOCAL"})
)
RETURN u.name,
       u.admincount,
       u.description,
       length(p) as HopsToDA
ORDER BY u.admincount DESC, HopsToDA ASC

// AS-REP Roastable + active in last 90 days
MATCH (u:User {dontreqpreauth:true, enabled:true})
WHERE u.lastlogontimestamp > (timestamp()/1000 - 7776000)
RETURN u.name, u.lastlogontimestamp, u.admincount
Remediation: Enable Kerberos pre-authentication for all accounts. This option is typically disabled to support older UNIX/Linux systems — modern Kerberos clients support it.
3. Unconstrained Delegation
When any user connects to a computer configured with unconstrained delegation, that user's TGT is stored in the computer's memory (LSASS). If an attacker compromises this computer and can coerce a DC to connect to it (via PrintSpooler/MS-RPRN, PetitPotam, etc.), they can steal the DC's TGT — equivalent to full domain compromise.
// Unconstrained delegation computers (excluding DCs)
MATCH (c:Computer {unconstraineddelegation:true, enabled:true})
WHERE NOT c.name CONTAINS 'DC'
RETURN c.name,
       c.operatingsystem,
       c.lastlogontimestamp,
       c.haslaps
ORDER BY c.name

// Users with local admin on unconstrained delegation computers
MATCH (u:User)-[:AdminTo]->(c:Computer {unconstraineddelegation:true, enabled:true})
WHERE NOT c.name CONTAINS 'DC'
RETURN u.name, c.name, u.enabled
Remediation options:
- Completely disable unconstrained delegation
- Replace with Resource-Based Constrained Delegation (RBCD)
- Add the computer to Protected Users group (delegation blocked)
- Set "Account is sensitive and cannot be delegated" flag (per-account basis)
- Disable PrintSpooler service on DCs (blocks coercion vector)
4. DCSync Rights
DCSync replicates the entire domain's hash database by impersonating a Domain Controller. An account needs specific AD replication permissions (DS-Replication-Get-Changes-All) to do this. This permission should exist only on DC computer accounts and specific service accounts (MSOL_, AZURE_).
// All principals with DCSync rights
MATCH p=(n)-[:DCSync]->(d:Domain)
RETURN n.name, n.objectid, labels(n) as NodeType

// Exclude DC computers — these are legitimate
MATCH p=(n)-[:DCSync]->(d:Domain)
WHERE NOT (n:Computer AND (
  n.name CONTAINS 'DC'
  OR n.name CONTAINS 'DOMAINCTRL'
))
RETURN n.name, labels(n) as NodeType, n.objectid

// DCSync accounts that are not Domain Admins
MATCH (n)-[:DCSync]->(d:Domain)
WHERE NOT EXISTS {
  MATCH (n)-[:MemberOf*..]->(g:Group {name:"DOMAIN ADMINS@CORP.LOCAL"})
}
RETURN n.name, labels(n)
Remediation: No accounts other than Azure AD Connect and ADFS service accounts should have DCSync rights. For unauthorized DCSync rights, remove immediately and review the last 30 days of NTDS audit logs for potential abuse.
5. Computers Missing LAPS
LAPS (Local Administrator Password Solution) automatically rotates each workstation's local Administrator password and stores it encrypted in AD. Without LAPS, all workstations may share the same local admin password — compromising one machine provides pivot capability across the entire network.
// Active computers missing LAPS
MATCH (c:Computer {enabled:true})
WHERE c.haslaps = false
RETURN c.name,
       c.operatingsystem,
       c.lastlogontimestamp
ORDER BY c.lastlogontimestamp DESC NULLS LAST

// LAPS coverage percentage
MATCH (c:Computer {enabled:true})
WITH count(c) as total
MATCH (c:Computer {enabled:true, haslaps:true})
RETURN count(c) as WithLAPS, total, (count(c)*100/total) as Percentage

// LAPS status by operating system
MATCH (c:Computer {enabled:true})
RETURN c.operatingsystem,
       count(c) as Total,
       sum(CASE WHEN c.haslaps THEN 1 ELSE 0 END) as WithLAPS
ORDER BY c.operatingsystem
Defensive Cypher Query Library
Below is the complete set of eight core query categories that blue teams should regularly run in BloodHound CE.
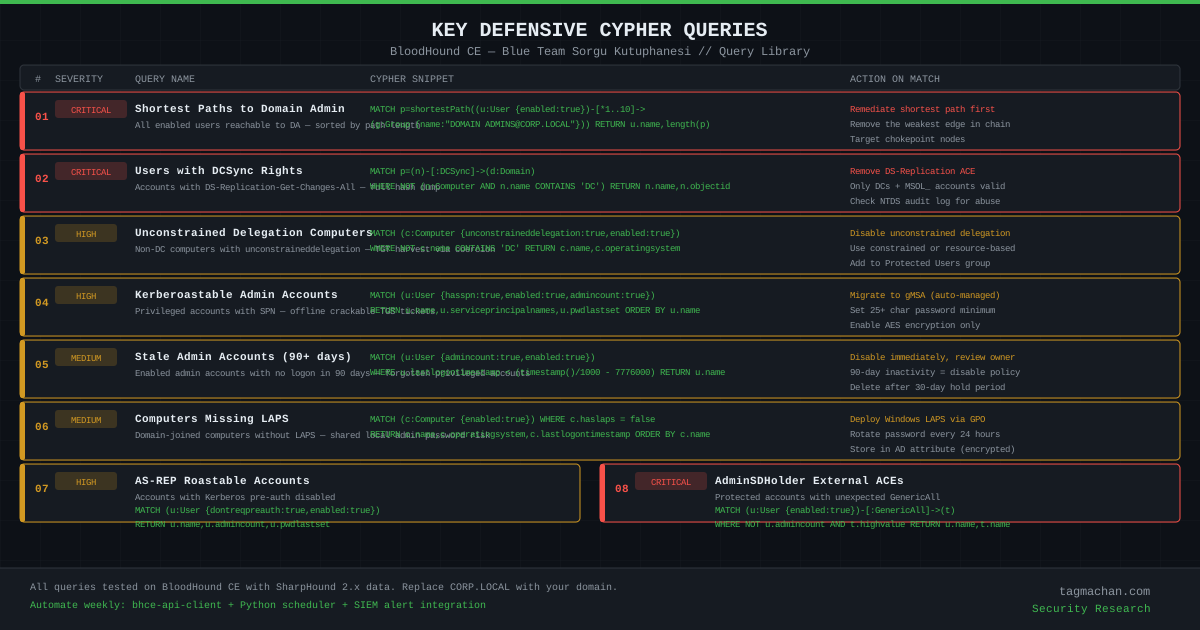
Query 1: Shortest Paths to Domain Admin
// All enabled users to DA — sorted by path length (top 20)
MATCH p=shortestPath(
  (u:User {enabled:true})
  -[*1..10]->
  (g:Group {name:"DOMAIN ADMINS@CORP.LOCAL"})
)
WHERE NOT u.name STARTS WITH 'CORP\\DA-'
RETURN u.name, length(p) as PathLength
ORDER BY PathLength ASC
LIMIT 20

// Path length distribution (how many users at each hop count)
MATCH p=shortestPath(
  (u:User {enabled:true})
  -[*1..10]->
  (g:Group {name:"DOMAIN ADMINS@CORP.LOCAL"})
)
WITH length(p) as hops, count(u) as UserCount
RETURN hops, UserCount
ORDER BY hops ASC
Query 2: DCSync Rights
// Full DCSync rights picture
MATCH p=(n)-[:DCSync]->(d:Domain)
WHERE NOT (n:Computer AND n.name CONTAINS 'DC')
RETURN n.name,
       n.objectid,
       labels(n) as NodeType,
       d.name as Domain
ORDER BY n.name
Query 3: Unconstrained Delegation Computers
// Unconstrained delegation + LAPS status + last seen
MATCH (c:Computer {unconstraineddelegation:true, enabled:true})
WHERE NOT c.name CONTAINS 'DC'
RETURN c.name,
       c.operatingsystem,
       c.haslaps,
       datetime({epochSeconds: toInteger(c.lastlogontimestamp)}) as LastSeen
ORDER BY c.lastlogontimestamp DESC NULLS LAST
Query 4: Kerberoastable Accounts Reachable from Tier 2
// Kerberoastable targets reachable from non-admin users
MATCH p=shortestPath(
  (u:User {enabled:true})
  -[*1..5]->
  (k:User {hasspn:true, enabled:true})
)
WHERE NOT u.admincount
RETURN u.name as SourceUser,
       k.name as KerberoastableTarget,
       k.serviceprincipalnames as SPNs,
       length(p) as Hops
ORDER BY Hops ASC
LIMIT 50
Query 5: Stale Admin Accounts (90+ days)
// admincount accounts with no logon in 90 days
MATCH (u:User {admincount:true, enabled:true})
WHERE u.lastlogontimestamp < (timestamp() / 1000 - 7776000)
RETURN u.name,
       u.description,
       datetime({epochSeconds: toInteger(u.lastlogontimestamp)}) as LastLogon,
       datetime({epochSeconds: toInteger(u.pwdlastset)}) as PasswordLastSet
ORDER BY u.lastlogontimestamp ASC

// Admin accounts that have never logged on
MATCH (u:User {admincount:true, enabled:true})
WHERE u.lastlogontimestamp <= 0 OR u.lastlogontimestamp IS NULL
RETURN u.name, u.description, u.whencreated
Query 6: Computers Missing LAPS
// LAPS missing, active, domain-joined computers
MATCH (c:Computer {enabled:true})
WHERE c.haslaps = false
RETURN c.name,
       c.operatingsystem,
       datetime({epochSeconds: toInteger(c.lastlogontimestamp)}) as LastSeen
ORDER BY c.operatingsystem, c.name
Query 7: AS-REP Roastable Accounts
// Kerberos pre-auth disabled, enabled accounts
MATCH (u:User {dontreqpreauth:true, enabled:true})
OPTIONAL MATCH p=shortestPath(
  (u)-[*1..10]->
  (g:Group {name:"DOMAIN ADMINS@CORP.LOCAL"})
)
RETURN u.name,
       u.admincount,
       u.description,
       length(p) as HopsToDA
ORDER BY HopsToDA ASC NULLS LAST
Query 8: Non-Admin Accounts with GenericAll on High-Value Targets
// Low-privilege accounts with control over high-value targets
MATCH (u:User {enabled:true})-[:GenericAll|GenericWrite]->(t)
WHERE NOT u.admincount
AND (t:Group OR t:Computer OR t:User)
AND (t.highvalue OR t.admincount)
RETURN u.name as Attacker,
       t.name as HighValueTarget,
       labels(t) as TargetType
ORDER BY u.name
Bonus — Shadow Credentials (msDS-KeyCredentialLink):
// GenericWrite/GenericAll → msDS-KeyCredentialLink manipulation
MATCH (u:User {enabled:true})-[r:GenericWrite|GenericAll|WriteAccountRestrictions]->(t:User|Computer)
WHERE NOT u.admincount
RETURN u.name as Source,
       t.name as Target,
       type(r) as EdgeType,
       t.enabled as TargetEnabled
ORDER BY u.name
Bonus — ADCS ESC Paths:
// Certificate template abuse path to DC
MATCH p=(u:User {enabled:true})
  -[:Enroll|GenericAll|GenericWrite]->
  (ct:CertTemplate)
  -[:PublishedTo]->
  (ca:EnterpriseCA)
WHERE ct.enrolleeSuppliesSubject = true
OR ct.authenticationenabled = true
RETURN u.name, ct.name, ca.name, ct.enrolleeSuppliesSubject

// ADCS ESC1: Any user can enroll + EKU authentication
MATCH (ct:CertTemplate)
WHERE ct.enrolleeSuppliesSubject = true
AND ct.authenticationenabled = true
AND ct.requiresmanagerapproval = false
RETURN ct.name, ct.oid
Attack Path Prioritization
In large organizations, hundreds of attack paths may exist. It is impossible to remediate all of them simultaneously. A systematic approach to prioritization is required.
Risk Score Calculation:
Risk Score = Impact × Probability × Exposure
- Impact (1-5): Where does the path lead? Tier 0 (5), Tier 1 (3), Tier 2 (1)?
- Probability (1-5): Path length. 1-2 hops (5), 3-4 hops (3), 5+ hops (1).
- Exposure (1-3): Is the source account internet-facing? Helpdesk/VPN/Webmail account (3), internal-only user (1).
Prioritization Matrix:
| Risk Score | Action | SLA |
|---|---|---|
| 60-75 | CRITICAL — Address immediately | 24-48 hours |
| 40-59 | HIGH — This sprint | 1 week |
| 20-39 | MEDIUM — Planned remediation | 1 month |
| 0-19 | LOW — Backlog | 3 months |
// Prioritization data: path length + account activity + admin status
MATCH p=shortestPath(
  (u:User {enabled:true})
  -[*1..10]->
  (g:Group {name:"DOMAIN ADMINS@CORP.LOCAL"})
)
WITH u, length(p) as hops
RETURN u.name,
       hops,
       u.admincount,
       u.lastlogontimestamp,
       CASE
         WHEN hops <= 2 THEN 'CRITICAL'
         WHEN hops <= 4 THEN 'HIGH'
         WHEN hops <= 6 THEN 'MEDIUM'
         ELSE 'LOW'
       END as Priority
ORDER BY hops ASC, u.lastlogontimestamp DESC
LIMIT 100
Attack Path Remediation Workflow
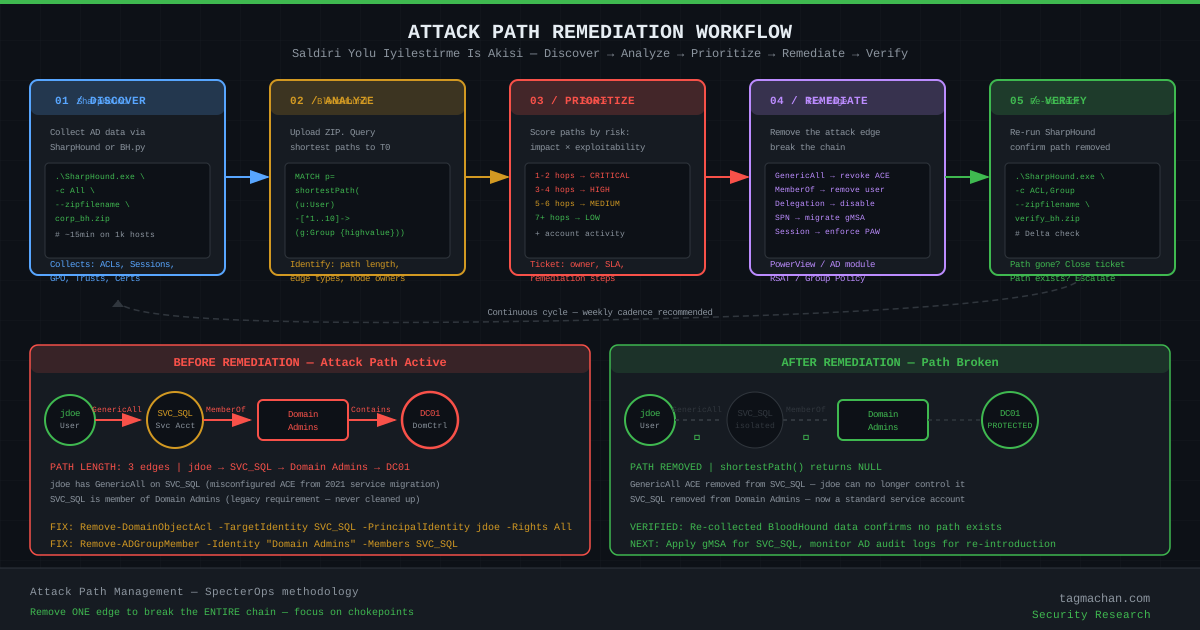
Specific remediation steps for each edge type:
GenericAll / GenericWrite → Remove
# Check who has access (PowerView)
Import-Module PowerView.ps1

Get-DomainObjectAcl -Identity "SVC_SQL" -ResolveGUIDs |
  Where-Object {$_.ActiveDirectoryRights -match "GenericAll"}

# Remove the ACE
Remove-DomainObjectAcl `
  -TargetIdentity "SVC_SQL" `
  -PrincipalIdentity "jdoe" `
  -Rights All `
  -Verbose

# Using AD Module (alternative to PowerView)
$acl = Get-Acl "AD:\CN=SVC_SQL,OU=ServiceAccounts,DC=corp,DC=local"
$ace = $acl.Access | Where-Object {
  $_.IdentityReference -eq "CORP\jdoe" -and
  $_.ActiveDirectoryRights -match "GenericControl"
}
$acl.RemoveAccessRule($ace)
Set-Acl "AD:\CN=SVC_SQL,OU=ServiceAccounts,DC=corp,DC=local" $acl
MemberOf (Incorrect Group Membership) → Remove
# Remove account from Domain Admins
Remove-ADGroupMember `
  -Identity "Domain Admins" `
  -Members "SVC_SQL" `
  -Confirm:$false

# Check all admin group memberships
Get-ADUser "SVC_SQL" -Properties MemberOf |
  Select-Object -ExpandProperty MemberOf |
  Get-ADGroup |
  Where-Object {$_.AdminCount -eq 1}
Unconstrained Delegation → Remove or Constrain
# Remove unconstrained delegation
Set-ADComputer "APPSERVER01" `
  -TrustedForDelegation $false

# Replace with constrained delegation
Set-ADComputer "APPSERVER01" `
  -TrustedToAuthForDelegation $true
Set-ADComputer "APPSERVER01" `
  -ServicePrincipalNames @{Add="HTTP/webapp.corp.local"}

# Add to Protected Users (completely blocks delegation per account)
Add-ADGroupMember "Protected Users" -Members "APPSERVER01$"
Kerberoastable Account → Replace with gMSA
# Create gMSA
New-ADServiceAccount `
  -Name "gMSA_SQL" `
  -DNSHostName "sql-srv01.corp.local" `
  -PrincipalsAllowedToRetrieveManagedPassword "SQL-SRV01$" `
  -KerberosEncryptionType AES128,AES256

# Configure SQL Server service to use gMSA
# SQL Server Configuration Manager → Service Account → NT SERVICE\gMSA_SQL$

# Disable old service account
Disable-ADAccount "svc_sql"
HasSession → Enforce PAW Policy
# Prevent Tier 0 admin accounts from logging on to Tier 2 machines
# GPO → Computer Config → Admin Templates → System → Credentials Delegation
# "Restrict delegation of credentials to remote servers" = Enabled

# Add admin accounts to Protected Users group
Add-ADGroupMember "Protected Users" -Members "DA-jsmith"

# Restrict logon workstations (per-account)
Set-ADUser "DA-jsmith" -LogonWorkstations "PAW-01,PAW-02,PAW-03"
BloodHound ADCS (Active Directory Certificate Services) Analysis
ADCS has emerged in recent years as a critical attack surface. Will Schroeder and Lee Christensen's "Certified Pre-Owned" research documented dozens of certificate template abuse scenarios. BloodHound CE models ADCS relationships (CertTemplate, EnterpriseCA, IssuedSignedBy) on the graph, making these attack paths visible.
ESC1 — Enrollee Supplies Subject + EKU Auth:
// ESC1: Any user can obtain a certificate that impersonates a DC
MATCH (ct:CertTemplate)
WHERE ct.enrolleeSuppliesSubject = true
AND ct.authenticationenabled = true
AND ct.requiresmanagerapproval = false
AND ct.nosecurityextension = false
MATCH (ca:EnterpriseCA)-[:PublishedTo]->(ct)
MATCH (u:User {enabled:true})-[:Enroll|GenericAll|GenericWrite]->(ct)
RETURN u.name, ct.name, ca.name
ORDER BY u.name
ESC4 — Template Overwrite:
// ESC4: User can modify certificate template properties
MATCH (u:User {enabled:true})-[:GenericAll|GenericWrite|WriteDacl|WriteOwner]->(ct:CertTemplate)
WHERE NOT u.admincount
RETURN u.name, ct.name, u.enabled
ORDER BY u.name
ESC7 — CA Officer/Manager:
// ESC7: CA management rights — approve arbitrary certificate requests
MATCH (u:User {enabled:true})-[:ManageCertificates|ManageCA]->(ca:EnterpriseCA)
WHERE NOT u.admincount
RETURN u.name, ca.name
ADCS Remediation Checklist:
# List all certificate templates
certutil -v -template | Select-String "Template Name:"

# For ESC1: Remove EnrolleesCanRequestCertificates
# Certificates snap-in (certtmpl.msc):
# Template → Properties → Subject Name → "Build from this Active Directory information"

# Require manager approval for sensitive templates
# Template → Properties → Issuance Requirements → "CA certificate manager approval" = ON

# Disable HTTP for NTLM relay prevention (ESC8)
# IIS Authentication → Disable: Windows Authentication (NTLM)
# Enable: HTTPS + FQDN enrollment
Automated Reporting and Continuous Monitoring
BloodHound CE exposes a REST API. Use it to build a weekly automated reporting system.
# BloodHound CE API authentication
TOKEN=$(curl -s -X POST http://localhost:8080/api/v2/auth/login \
  -H "Content-Type: application/json" \
  -d '{"login_name":"admin","secret":"YourPassword123"}' \
  | jq -r '.data.session_token')

echo "Token: $TOKEN"
#!/usr/bin/env python3
"""
BloodHound CE Weekly Defensive Report
Run every Monday morning: cron 0 8 * * 1
"""
import requests
import json
from datetime import datetime, timedelta

BHCE_URL = "http://localhost:8080"
USERNAME = "svc_reporting"
PASSWORD = "SecureP@ss!"

def get_token():
    r = requests.post(f"{BHCE_URL}/api/v2/auth/login",
                      json={"login_name": USERNAME, "secret": PASSWORD})
    return r.json()["data"]["session_token"]

def run_cypher(token, query):
    headers = {"Authorization": f"Bearer {token}",
               "Content-Type": "application/json"}
    r = requests.post(f"{BHCE_URL}/api/v2/graphs/cypher",
                      headers=headers,
                      json={"query": query})
    return r.json()

def generate_weekly_report():
    token = get_token()
    report = {
        "date": datetime.now().isoformat(),
        "findings": {}
    }

    # Shortest paths to DA
    da_paths = run_cypher(token, """
        MATCH p=shortestPath(
          (u:User {enabled:true})-[*1..10]->
          (g:Group {name:"DOMAIN ADMINS@CORP.LOCAL"})
        )
        RETURN u.name, length(p) as hops
        ORDER BY hops ASC LIMIT 20
    """)
    report["findings"]["shortest_paths_to_da"] = da_paths

    # DCSync rights
    dcsync = run_cypher(token, """
        MATCH (n)-[:DCSync]->(d:Domain)
        WHERE NOT (n:Computer AND n.name CONTAINS 'DC')
        RETURN n.name, labels(n)
    """)
    report["findings"]["dcsync_accounts"] = dcsync

    # Stale admins
    stale = run_cypher(token, f"""
        MATCH (u:User {admincount:true, enabled:true})
        WHERE u.lastlogontimestamp < {int((datetime.now() - timedelta(days=90)).timestamp())}
        RETURN u.name, u.lastlogontimestamp
        ORDER BY u.lastlogontimestamp ASC
    """)
    report["findings"]["stale_admins"] = stale

    # Save report
    filename = f"bhce_report_{datetime.now().strftime('%Y%m%d')}.json"
    with open(filename, 'w') as f:
        json.dump(report, f, indent=2)

    print(f"[+] Report saved: {filename}")
    return report

if __name__ == "__main__":
    report = generate_weekly_report()

    # Alert on critical findings
    if report["findings"]["dcsync_accounts"].get("data", {}).get("nodes"):
        print("[!] CRITICAL: Unauthorized DCSync accounts detected!")
        # Send email/Slack/Teams notification
Delta Analysis — Week-over-Week Changes:
def compare_reports(old_report, new_report):
    """Detect new attack paths compared to the previous week"""
    old_users = set(
        item["u.name"]
        for item in old_report["findings"]["shortest_paths_to_da"].get("data", {}).get("nodes", [])
    )
    new_users = set(
        item["u.name"]
        for item in new_report["findings"]["shortest_paths_to_da"].get("data", {}).get("nodes", [])
    )

    new_exposures = new_users - old_users
    fixed_paths = old_users - new_users

    if new_exposures:
        print(f"[!] NEW EXPOSED ACCOUNTS: {new_exposures}")
    if fixed_paths:
        print(f"[+] REMEDIATED ACCOUNTS: {fixed_paths}")
Defensive Investment Priorities
Regardless of what BloodHound findings reveal, the following foundational security controls should be present in every AD environment:
1. Tier 0 Isolation
- Separate OU structure for DCs, CAs, and ADFS
- PAW (Privileged Access Workstation): Dedicated, hardened workstations for Tier 0 management
- Separate credentials for admin accounts (
jsmith≠DA-jsmith) - JIT (Just-In-Time) access: Admin rights only when needed, with time limits
2. MFA for All Admin Accounts
- Azure AD MFA or Microsoft Authenticator
- Smart card / Windows Hello for Business (FIDO2)
- Phishing-resistant MFA preferred
- Conditional Access — restrict by location and device compliance
3. LAPS Deployment
- Windows LAPS (built into Windows 11 / Server 2022)
- Legacy Windows: Microsoft LAPS MSI
- Every workstation and server — DCs excluded
- Password rotation: 24 hours (workstations), 48 hours (servers)
- Restrict LAPS password read access to privileged groups only
4. SMB Signing Enforcement
# GPO: Computer Configuration → Windows Settings →
# Security Settings → Local Policies → Security Options
# "Microsoft network server: Digitally sign communications (always)" = Enabled
# "Microsoft network client: Digitally sign communications (always)" = Enabled
5. Protected Users Group
- All Tier 0 accounts should be Protected Users members
- Effects: removes RC4, blocks delegation, removes NTLM, shortens TGT lifetime
- Warning: Some legacy applications require NTLM — test before deploying!
6. Credential Guard
# Enable Credential Guard (requires UEFI + Secure Boot)
# GPO: Computer Config → Admin Templates → System → Device Guard
# "Turn On Virtualization Based Security" = Enabled
# "Credential Guard Configuration" = Enabled with UEFI lock

# Verify via PowerShell
(Get-ComputerInfo).DeviceGuardSecurityServicesRunning
7. Weekly BloodHound Analysis
- SharpHound collection: Automated every Sunday night
- Delta analysis: Are there new paths?
- Create tickets: Jira/ServiceNow for prioritized findings
- Track metrics: Average path length trend across the domain over time
8. Audit Logging (Event Monitoring)
# DCSync attempt detection — Event ID 4662
# DS-Replication-Get-Changes-All access attempt
# SIEM rule: Event 4662 + AccessMask = 0x100 or 0x10

# AdminSDHolder modification detection — Event ID 5136
# SIEM rule: 5136 + ObjectClass = ms-DS-Admin-Count

# Unauthorized ACL change — Event IDs 5136, 4670
# Kerberoast attempt — Event ID 4769 + TicketOptions 0x40810000

# Enable Advanced Audit via GPO
# Computer Config → Windows Settings → Security Settings → Advanced Audit Policy
# Account Logon: Kerberos Service Ticket Operations = Success, Failure
# DS Access: Directory Service Changes = Success
# Logon/Logoff: Special Logon = Success
References and Further Reading
Primary Sources:
- Andy Robbins, Rohan Vazarkar, Will Schroeder — BloodHound (2016) and all subsequent research
- SpecterOps — Attack Path Management methodology and BloodHound CE
- GitHub:
github.com/SpecterOps/BloodHound(Apache 2.0)
Academic and Technical References:
- Microsoft ESAE (Enhanced Security Admin Environment) — Retired; succeeded by the Enterprise Access Model
- Microsoft Enterprise Access Model — Current reference for tiered administration
- "Certified Pre-Owned" — Will Schroeder, Lee Christensen (ADCS attacks, 2021)
- "The Dog Whisperer's Handbook" — harmj0y (BloodHound usage guide)
- "An Ace Up the Sleeve" — Andy Robbins, Will Schroeder (ACL attacks)
- "Not a Security Boundary" — Andy Robbins (forest trust attacks)
- "Kerberoasting Without Mimikatz" — Tim Medin (original Kerberoasting technique)
Tools Referenced:
- SharpHound:
github.com/SpecterOps/SharpHound - BloodHound.py:
github.com/dirkjanm/BloodHound.py - PowerView:
github.com/PowerShellMafia/PowerSploit - Impacket:
github.com/fortra/impacket(DCSync, AS-REP roasting, Kerberoasting) - Certipy:
github.com/ly4k/Certipy(ADCS attack and analysis) - ADACLScanner:
github.com/canix1/ADACLScanner(ACL audit reporting) - PingCastle:
pingcastle.com(AD risk assessment — complementary to BloodHound)
Introduction: Using the Attacker's Map for Defense
When Andy Robbins, Rohan Vazarkar, and Will Schroeder unveiled BloodHound at DEF CON 2016, the audience reaction was mixed: red teamers were elated, while many system administrators struggled to grasp how dangerous it truly was. BloodHound modeled Active Directory relationships in a graph database and calculated the shortest attack paths across that graph. An attacker with any standard domain user account could automatically find the path to Domain Admin.
Today the picture is different. SpecterOps transformed BloodHound into the foundation of Attack Path Management (APM): no longer just a reconnaissance weapon for attackers, but a defensive platform that blue teams use to continuously measure their AD security posture. BloodHound Community Edition (CE) is the free, open-source implementation of this next-generation approach.
In this post we examine BloodHound CE from a strictly defensive perspective — from installation and collection methodology to tier model implementation, custom Cypher queries, attack path prioritization, and systematic remediation workflows. The goal is to see your Active Directory environment through an attacker's eyes and close critical security gaps before they are exploited.
BloodHound CE vs. Legacy BloodHound: What Changed?
BloodHound has evolved into three distinct products. Understanding the differences is essential for choosing the right tool.
Legacy BloodHound (v4 and earlier)
The original BloodHound was an Electron-based desktop application. Single-user, with Neo4j running locally. Installation was painful, especially on non-Windows platforms. While still functional for certain use cases, it is no longer recommended for enterprise environments.
BloodHound CE (Community Edition — v5+)
Modern BloodHound was completely rewritten. It ships with a React-based web UI, services that spin up in seconds via Docker Compose, multi-user access with RBAC, a REST API, and two database layers (PostgreSQL + Neo4j). One command to install, access from any browser. BloodHound CE is distributed on GitHub under the Apache 2.0 license.
BloodHound Enterprise (BHE)
SpecterOps's commercial product. Everything in CE plus continuous Attack Path Management, automated reporting, tenant-based multi-forest support, Tier Zero asset management, and SIEM integrations. Designed for large enterprises; pricing is license-based.
SharpHound vs BloodHound.py: The Collectors
- SharpHound (.NET): The official collector. Runs from Windows, does not require a domain-joined machine (can be used remotely), produces the most comprehensive dataset. Supports all collection methods: ACL, Session, LoggedOn, ObjectProps, Trusts, Container, CertServices, GPOLocalGroup.
- BloodHound.py (Python): Community-supported, runs on Linux/macOS. Requires only network access and valid domain credentials — no domain-joined machine needed. Works over LDAP+Kerberos. Some collection methods are absent or slower than SharpHound.
BloodHound CE Installation
Docker Compose is the fastest path to BloodHound CE. In production environments, use a dedicated analysis machine (jump host or secure workstation).
# Single-command installation — requires Docker and Docker Compose
curl -L https://ghst.ly/getbhce | docker compose -f - up

# Run in background
curl -L https://ghst.ly/getbhce | docker compose -f - up -d

# Default URL: http://localhost:8080
# Initial login password shown in Docker logs:
docker logs bloodhound-ce_bloodhound_1 2>&1 | grep "Initial Password"
After installation, BloodHound CE runs three containers:
bloodhound: Main application (Go backend + React frontend)graph-db: Neo4j 4.4 (Cypher query engine)app-db: PostgreSQL (user management, application state)
On first login, change your password and create a reporting service account or API token.
Secure Deployment Notes:
# In production, bind to localhost only instead of 0.0.0.0
# In docker-compose.yml:
# ports:
#   - "127.0.0.1:8080:8080"

# For TLS, place an nginx reverse proxy in front
# Keep the collection endpoint behind VPN during data ingestion
Data Collection with SharpHound
Collection is the foundation of all analysis. Understanding what SharpHound collects and how it operates is critical both for correct analysis and for evaluating the network noise the collection creates.
Core Collection Methods:
# Collect all data (most comprehensive, most noisy)
.\SharpHound.exe -c All --zipfilename corp_bhdata.zip

# Collect from DCs only — much less noisy, faster
.\SharpHound.exe -c DCOnly

# ACL and group data only (no session data)
.\SharpHound.exe -c ACL,Group,ObjectProps,Container

# Session data — which user is logged on to which machine
# Requires local admin rights on targets (over SMB)
.\SharpHound.exe -c Session,LoggedOn --computermaxconn 5

# Target a specific OU (partitioned collection for large environments)
.\SharpHound.exe -c All --searchbase "OU=Workstations,DC=corp,DC=local"

# ADCS data (certificate templates, CAs)
.\SharpHound.exe -c CertServices

# Remote domain collection (from a non-domain-joined machine)
.\SharpHound.exe -c All -d corp.local --ldapusername jdoe --ldappassword 'P@ssw0rd'
# Remote collection from Linux (BloodHound.py)
pip3 install bloodhound
python3 bloodhound.py \
  -u jdoe \
  -p 'Password123' \
  -d corp.local \
  -dc dc01.corp.local \
  -c all \
  --zip \
  --dns-tcp

# With Kerberos authentication (Pass-the-Hash or PKINIT)
python3 bloodhound.py \
  -u jdoe@corp.local \
  --hashes :aad3b435b51404eeaad3b435b51404ee:31d6cfe0d16ae931b73c59d7e0c089c0 \
  -d corp.local \
  -dc dc01.corp.local \
  -c all \
  --zip
Collection Security and Noise Management:
BloodHound collection leaves traces in the domain environment. As a blue team operator running authorized collection, define a maintenance window:
Sessioncollection: Opens SMB connections to each target. Can be detected by IDS/IPS.LoggedOncollection: Requires Remote Registry service — won't work on systems that haven't enabled it.ACLcollection: Works over LDAP, nearly silent. Preferred starting point.- Create a dedicated service account for collection:
svc_bloodhound. Minimum rights: domain user + RemoteRegistry read.
Tier Model: Credential Isolation Architecture
However rich the BloodHound data, it is meaningless without context. That context is the Tier Model — a credential isolation architecture based on Microsoft's ESAE (Enhanced Security Admin Environment) and PAW (Privileged Access Workstations) framework.
Tier 0 — Control Plane
Tier 0 encompasses assets that control the identity plane. If this tier is compromised, every digital asset in the organization is at risk.
Tier 0 assets:
- Domain Controllers (all DCs, including RODCs)
- Enterprise CA servers (ADCS PKI infrastructure)
- ADFS servers (federation and token signing)
- Azure AD Connect / AAD Sync (identity sync, includes hash sync)
- Backup systems managing Tier 0 (Veeam, Backup Exec — AD-aware)
- Domain Admins, Enterprise Admins, Schema Admins groups
- Tier 0 PAWs (privileged access workstations used to manage these assets)
Tier 1 — Server Tier
Enterprise applications, databases, and infrastructure services. Tier 0 credentials are never used here.
Tier 1 assets:
- Application servers (IIS, Tomcat, JBoss)
- Database servers (SQL Server, Oracle)
- File servers (DFS, SMB shares)
- Exchange / mail servers (Exchange WriteDACL risk is particularly notable)
- SCCM / Intune management servers
- Tier 1 service accounts
Tier 2 — User Tier
The tier most exposed to the internet; primary target for phishing and initial-access attacks.
Tier 2 assets:
- User workstations and laptops
- Virtual desktops (VDI)
- Helpdesk accounts (must be kept within Tier 2 scope)
- Standard domain users
Detecting Tier Violations with BloodHound:
Before implementing the tier model you must detect existing violations. BloodHound is extremely valuable here:
// Any path from a Tier 2 user to a Tier 0 asset
MATCH p=shortestPath(
  (u:User {enabled:true})
  -[*1..8]->
  (t:Computer)
)
WHERE t.name IN ['DC01.CORP.LOCAL', 'CA01.CORP.LOCAL', 'ADFSRV01.CORP.LOCAL']
AND NOT u.name STARTS WITH 'CORP\\DA-'
RETURN u.name, t.name, length(p) as Hops
ORDER BY Hops ASC

// Is a service account a member of Tier 0 groups?
MATCH (u:User)-[:MemberOf*1..]->(g:Group)
WHERE g.name =~ '(?i).*(domain admins|enterprise admins|schema admins).*'
AND u.name =~ '(?i).*(svc_|service_|sa_).*'
RETURN u.name, g.name
Critical Attack Path Categories
BloodHound excels at identifying several critical attack path categories. Here we examine each one — how to detect it and how to remediate it.
1. Kerberoasting Paths
Kerberoasting exploits accounts with registered SPNs (Service Principal Names) by requesting and offline-cracking their TGS tickets. Queried in BloodHound via the hasspn:true property.
Risk factors:
- Account has
admincount:true— direct Domain Admin path - Password last changed date is old — higher probability of weak password
- RC4 encryption is supported — cracked very quickly by modern GPUs
- Account last logon date is old — orphaned account
// Kerberoastable accounts and their distance to DA
MATCH (u:User {hasspn:true, enabled:true})
OPTIONAL MATCH p=shortestPath(
  (u)-[*1..10]->
  (g:Group {name:"DOMAIN ADMINS@CORP.LOCAL"})
)
RETURN u.name,
       u.serviceprincipalnames,
       u.pwdlastset,
       u.admincount,
       length(p) as HopsToDA
ORDER BY HopsToDA ASC NULLS LAST

// High-value Kerberoastable accounts (on path to DA)
MATCH (u:User {hasspn:true, enabled:true, admincount:true})
RETURN u.name,
       u.serviceprincipalnames,
       datetime({epochSeconds: toInteger(u.pwdlastset)}) as PasswordLastSet
Remediation priorities:
- All Kerberoastable admin accounts → replace with gMSA (Group Managed Service Account)
- If gMSA is not possible: enforce AES256 encryption, 25+ character password, 180-day rotation
- Add account to Protected Users group (removes RC4, shortens TGS lifetime)
2. AS-REP Roasting
Accounts with Kerberos pre-authentication disabled can receive an encrypted response without any authentication — that response can be cracked offline.
// AS-REP Roastable accounts and impact analysis
MATCH (u:User {dontreqpreauth:true, enabled:true})
OPTIONAL MATCH p=shortestPath(
  (u)-[*1..10]->
  (g:Group {name:"DOMAIN ADMINS@CORP.LOCAL"})
)
RETURN u.name,
       u.admincount,
       u.description,
       length(p) as HopsToDA
ORDER BY u.admincount DESC, HopsToDA ASC

// AS-REP Roastable + active in last 90 days
MATCH (u:User {dontreqpreauth:true, enabled:true})
WHERE u.lastlogontimestamp > (timestamp()/1000 - 7776000)
RETURN u.name, u.lastlogontimestamp, u.admincount
Remediation: Enable Kerberos pre-authentication for all accounts. This option is typically disabled to support older UNIX/Linux systems — modern Kerberos clients support it.
3. Unconstrained Delegation
When any user connects to a computer configured with unconstrained delegation, that user's TGT is stored in the computer's memory (LSASS). If an attacker compromises this computer and can coerce a DC to connect to it (via PrintSpooler/MS-RPRN, PetitPotam, etc.), they can steal the DC's TGT — equivalent to full domain compromise.
// Unconstrained delegation computers (excluding DCs)
MATCH (c:Computer {unconstraineddelegation:true, enabled:true})
WHERE NOT c.name CONTAINS 'DC'
RETURN c.name,
       c.operatingsystem,
       c.lastlogontimestamp,
       c.haslaps
ORDER BY c.name

// Users with local admin on unconstrained delegation computers
MATCH (u:User)-[:AdminTo]->(c:Computer {unconstraineddelegation:true, enabled:true})
WHERE NOT c.name CONTAINS 'DC'
RETURN u.name, c.name, u.enabled
Remediation options:
- Completely disable unconstrained delegation
- Replace with Resource-Based Constrained Delegation (RBCD)
- Add the computer to Protected Users group (delegation blocked)
- Set "Account is sensitive and cannot be delegated" flag (per-account basis)
- Disable PrintSpooler service on DCs (blocks coercion vector)
4. DCSync Rights
DCSync replicates the entire domain's hash database by impersonating a Domain Controller. An account needs specific AD replication permissions (DS-Replication-Get-Changes-All) to do this. This permission should exist only on DC computer accounts and specific service accounts (MSOL_, AZURE_).
// All principals with DCSync rights
MATCH p=(n)-[:DCSync]->(d:Domain)
RETURN n.name, n.objectid, labels(n) as NodeType

// Exclude DC computers — these are legitimate
MATCH p=(n)-[:DCSync]->(d:Domain)
WHERE NOT (n:Computer AND (
  n.name CONTAINS 'DC'
  OR n.name CONTAINS 'DOMAINCTRL'
))
RETURN n.name, labels(n) as NodeType, n.objectid

// DCSync accounts that are not Domain Admins
MATCH (n)-[:DCSync]->(d:Domain)
WHERE NOT EXISTS {
  MATCH (n)-[:MemberOf*..]->(g:Group {name:"DOMAIN ADMINS@CORP.LOCAL"})
}
RETURN n.name, labels(n)
Remediation: No accounts other than Azure AD Connect and ADFS service accounts should have DCSync rights. For unauthorized DCSync rights, remove immediately and review the last 30 days of NTDS audit logs for potential abuse.
5. Computers Missing LAPS
LAPS (Local Administrator Password Solution) automatically rotates each workstation's local Administrator password and stores it encrypted in AD. Without LAPS, all workstations may share the same local admin password — compromising one machine provides pivot capability across the entire network.
// Active computers missing LAPS
MATCH (c:Computer {enabled:true})
WHERE c.haslaps = false
RETURN c.name,
       c.operatingsystem,
       c.lastlogontimestamp
ORDER BY c.lastlogontimestamp DESC NULLS LAST

// LAPS coverage percentage
MATCH (c:Computer {enabled:true})
WITH count(c) as total
MATCH (c:Computer {enabled:true, haslaps:true})
RETURN count(c) as WithLAPS, total, (count(c)*100/total) as Percentage

// LAPS status by operating system
MATCH (c:Computer {enabled:true})
RETURN c.operatingsystem,
       count(c) as Total,
       sum(CASE WHEN c.haslaps THEN 1 ELSE 0 END) as WithLAPS
ORDER BY c.operatingsystem
Defensive Cypher Query Library
Below is the complete set of eight core query categories that blue teams should regularly run in BloodHound CE.
Query 1: Shortest Paths to Domain Admin
// All enabled users to DA — sorted by path length (top 20)
MATCH p=shortestPath(
  (u:User {enabled:true})
  -[*1..10]->
  (g:Group {name:"DOMAIN ADMINS@CORP.LOCAL"})
)
WHERE NOT u.name STARTS WITH 'CORP\\DA-'
RETURN u.name, length(p) as PathLength
ORDER BY PathLength ASC
LIMIT 20

// Path length distribution (how many users at each hop count)
MATCH p=shortestPath(
  (u:User {enabled:true})
  -[*1..10]->
  (g:Group {name:"DOMAIN ADMINS@CORP.LOCAL"})
)
WITH length(p) as hops, count(u) as UserCount
RETURN hops, UserCount
ORDER BY hops ASC
Query 2: DCSync Rights
// Full DCSync rights picture
MATCH p=(n)-[:DCSync]->(d:Domain)
WHERE NOT (n:Computer AND n.name CONTAINS 'DC')
RETURN n.name,
       n.objectid,
       labels(n) as NodeType,
       d.name as Domain
ORDER BY n.name
Query 3: Unconstrained Delegation Computers
// Unconstrained delegation + LAPS status + last seen
MATCH (c:Computer {unconstraineddelegation:true, enabled:true})
WHERE NOT c.name CONTAINS 'DC'
RETURN c.name,
       c.operatingsystem,
       c.haslaps,
       datetime({epochSeconds: toInteger(c.lastlogontimestamp)}) as LastSeen
ORDER BY c.lastlogontimestamp DESC NULLS LAST
Query 4: Kerberoastable Accounts Reachable from Tier 2
// Kerberoastable targets reachable from non-admin users
MATCH p=shortestPath(
  (u:User {enabled:true})
  -[*1..5]->
  (k:User {hasspn:true, enabled:true})
)
WHERE NOT u.admincount
RETURN u.name as SourceUser,
       k.name as KerberoastableTarget,
       k.serviceprincipalnames as SPNs,
       length(p) as Hops
ORDER BY Hops ASC
LIMIT 50
Query 5: Stale Admin Accounts (90+ days)
// admincount accounts with no logon in 90 days
MATCH (u:User {admincount:true, enabled:true})
WHERE u.lastlogontimestamp < (timestamp() / 1000 - 7776000)
RETURN u.name,
       u.description,
       datetime({epochSeconds: toInteger(u.lastlogontimestamp)}) as LastLogon,
       datetime({epochSeconds: toInteger(u.pwdlastset)}) as PasswordLastSet
ORDER BY u.lastlogontimestamp ASC

// Admin accounts that have never logged on
MATCH (u:User {admincount:true, enabled:true})
WHERE u.lastlogontimestamp <= 0 OR u.lastlogontimestamp IS NULL
RETURN u.name, u.description, u.whencreated
Query 6: Computers Missing LAPS
// LAPS missing, active, domain-joined computers
MATCH (c:Computer {enabled:true})
WHERE c.haslaps = false
RETURN c.name,
       c.operatingsystem,
       datetime({epochSeconds: toInteger(c.lastlogontimestamp)}) as LastSeen
ORDER BY c.operatingsystem, c.name
Query 7: AS-REP Roastable Accounts
// Kerberos pre-auth disabled, enabled accounts
MATCH (u:User {dontreqpreauth:true, enabled:true})
OPTIONAL MATCH p=shortestPath(
  (u)-[*1..10]->
  (g:Group {name:"DOMAIN ADMINS@CORP.LOCAL"})
)
RETURN u.name,
       u.admincount,
       u.description,
       length(p) as HopsToDA
ORDER BY HopsToDA ASC NULLS LAST
Query 8: Non-Admin Accounts with GenericAll on High-Value Targets
// Low-privilege accounts with control over high-value targets
MATCH (u:User {enabled:true})-[:GenericAll|GenericWrite]->(t)
WHERE NOT u.admincount
AND (t:Group OR t:Computer OR t:User)
AND (t.highvalue OR t.admincount)
RETURN u.name as Attacker,
       t.name as HighValueTarget,
       labels(t) as TargetType
ORDER BY u.name
Bonus — Shadow Credentials (msDS-KeyCredentialLink):
// GenericWrite/GenericAll → msDS-KeyCredentialLink manipulation
MATCH (u:User {enabled:true})-[r:GenericWrite|GenericAll|WriteAccountRestrictions]->(t:User|Computer)
WHERE NOT u.admincount
RETURN u.name as Source,
       t.name as Target,
       type(r) as EdgeType,
       t.enabled as TargetEnabled
ORDER BY u.name
Bonus — ADCS ESC Paths:
// Certificate template abuse path to DC
MATCH p=(u:User {enabled:true})
  -[:Enroll|GenericAll|GenericWrite]->
  (ct:CertTemplate)
  -[:PublishedTo]->
  (ca:EnterpriseCA)
WHERE ct.enrolleeSuppliesSubject = true
OR ct.authenticationenabled = true
RETURN u.name, ct.name, ca.name, ct.enrolleeSuppliesSubject

// ADCS ESC1: Any user can enroll + EKU authentication
MATCH (ct:CertTemplate)
WHERE ct.enrolleeSuppliesSubject = true
AND ct.authenticationenabled = true
AND ct.requiresmanagerapproval = false
RETURN ct.name, ct.oid
Attack Path Prioritization
In large organizations, hundreds of attack paths may exist. It is impossible to remediate all of them simultaneously. A systematic approach to prioritization is required.
Risk Score Calculation:
Risk Score = Impact × Probability × Exposure
- Impact (1-5): Where does the path lead? Tier 0 (5), Tier 1 (3), Tier 2 (1)?
- Probability (1-5): Path length. 1-2 hops (5), 3-4 hops (3), 5+ hops (1).
- Exposure (1-3): Is the source account internet-facing? Helpdesk/VPN/Webmail account (3), internal-only user (1).
Prioritization Matrix:
| Risk Score | Action | SLA |
|---|---|---|
| 60-75 | CRITICAL — Address immediately | 24-48 hours |
| 40-59 | HIGH — This sprint | 1 week |
| 20-39 | MEDIUM — Planned remediation | 1 month |
| 0-19 | LOW — Backlog | 3 months |
// Prioritization data: path length + account activity + admin status
MATCH p=shortestPath(
  (u:User {enabled:true})
  -[*1..10]->
  (g:Group {name:"DOMAIN ADMINS@CORP.LOCAL"})
)
WITH u, length(p) as hops
RETURN u.name,
       hops,
       u.admincount,
       u.lastlogontimestamp,
       CASE
         WHEN hops <= 2 THEN 'CRITICAL'
         WHEN hops <= 4 THEN 'HIGH'
         WHEN hops <= 6 THEN 'MEDIUM'
         ELSE 'LOW'
       END as Priority
ORDER BY hops ASC, u.lastlogontimestamp DESC
LIMIT 100
Attack Path Remediation Workflow
Specific remediation steps for each edge type:
GenericAll / GenericWrite → Remove
# Check who has access (PowerView)
Import-Module PowerView.ps1

Get-DomainObjectAcl -Identity "SVC_SQL" -ResolveGUIDs |
  Where-Object {$_.ActiveDirectoryRights -match "GenericAll"}

# Remove the ACE
Remove-DomainObjectAcl `
  -TargetIdentity "SVC_SQL" `
  -PrincipalIdentity "jdoe" `
  -Rights All `
  -Verbose

# Using AD Module (alternative to PowerView)
$acl = Get-Acl "AD:\CN=SVC_SQL,OU=ServiceAccounts,DC=corp,DC=local"
$ace = $acl.Access | Where-Object {
  $_.IdentityReference -eq "CORP\jdoe" -and
  $_.ActiveDirectoryRights -match "GenericControl"
}
$acl.RemoveAccessRule($ace)
Set-Acl "AD:\CN=SVC_SQL,OU=ServiceAccounts,DC=corp,DC=local" $acl
MemberOf (Incorrect Group Membership) → Remove
# Remove account from Domain Admins
Remove-ADGroupMember `
  -Identity "Domain Admins" `
  -Members "SVC_SQL" `
  -Confirm:$false

# Check all admin group memberships
Get-ADUser "SVC_SQL" -Properties MemberOf |
  Select-Object -ExpandProperty MemberOf |
  Get-ADGroup |
  Where-Object {$_.AdminCount -eq 1}
Unconstrained Delegation → Remove or Constrain
# Remove unconstrained delegation
Set-ADComputer "APPSERVER01" `
  -TrustedForDelegation $false

# Replace with constrained delegation
Set-ADComputer "APPSERVER01" `
  -TrustedToAuthForDelegation $true
Set-ADComputer "APPSERVER01" `
  -ServicePrincipalNames @{Add="HTTP/webapp.corp.local"}

# Add to Protected Users (completely blocks delegation per account)
Add-ADGroupMember "Protected Users" -Members "APPSERVER01$"
Kerberoastable Account → Replace with gMSA
# Create gMSA
New-ADServiceAccount `
  -Name "gMSA_SQL" `
  -DNSHostName "sql-srv01.corp.local" `
  -PrincipalsAllowedToRetrieveManagedPassword "SQL-SRV01$" `
  -KerberosEncryptionType AES128,AES256

# Configure SQL Server service to use gMSA
# SQL Server Configuration Manager → Service Account → NT SERVICE\gMSA_SQL$

# Disable old service account
Disable-ADAccount "svc_sql"
HasSession → Enforce PAW Policy
# Prevent Tier 0 admin accounts from logging on to Tier 2 machines
# GPO → Computer Config → Admin Templates → System → Credentials Delegation
# "Restrict delegation of credentials to remote servers" = Enabled

# Add admin accounts to Protected Users group
Add-ADGroupMember "Protected Users" -Members "DA-jsmith"

# Restrict logon workstations (per-account)
Set-ADUser "DA-jsmith" -LogonWorkstations "PAW-01,PAW-02,PAW-03"
BloodHound ADCS (Active Directory Certificate Services) Analysis
ADCS has emerged in recent years as a critical attack surface. Will Schroeder and Lee Christensen's "Certified Pre-Owned" research documented dozens of certificate template abuse scenarios. BloodHound CE models ADCS relationships (CertTemplate, EnterpriseCA, IssuedSignedBy) on the graph, making these attack paths visible.
ESC1 — Enrollee Supplies Subject + EKU Auth:
// ESC1: Any user can obtain a certificate that impersonates a DC
MATCH (ct:CertTemplate)
WHERE ct.enrolleeSuppliesSubject = true
AND ct.authenticationenabled = true
AND ct.requiresmanagerapproval = false
AND ct.nosecurityextension = false
MATCH (ca:EnterpriseCA)-[:PublishedTo]->(ct)
MATCH (u:User {enabled:true})-[:Enroll|GenericAll|GenericWrite]->(ct)
RETURN u.name, ct.name, ca.name
ORDER BY u.name
ESC4 — Template Overwrite:
// ESC4: User can modify certificate template properties
MATCH (u:User {enabled:true})-[:GenericAll|GenericWrite|WriteDacl|WriteOwner]->(ct:CertTemplate)
WHERE NOT u.admincount
RETURN u.name, ct.name, u.enabled
ORDER BY u.name
ESC7 — CA Officer/Manager:
// ESC7: CA management rights — approve arbitrary certificate requests
MATCH (u:User {enabled:true})-[:ManageCertificates|ManageCA]->(ca:EnterpriseCA)
WHERE NOT u.admincount
RETURN u.name, ca.name
ADCS Remediation Checklist:
# List all certificate templates
certutil -v -template | Select-String "Template Name:"

# For ESC1: Remove EnrolleesCanRequestCertificates
# Certificates snap-in (certtmpl.msc):
# Template → Properties → Subject Name → "Build from this Active Directory information"

# Require manager approval for sensitive templates
# Template → Properties → Issuance Requirements → "CA certificate manager approval" = ON

# Disable HTTP for NTLM relay prevention (ESC8)
# IIS Authentication → Disable: Windows Authentication (NTLM)
# Enable: HTTPS + FQDN enrollment
Automated Reporting and Continuous Monitoring
BloodHound CE exposes a REST API. Use it to build a weekly automated reporting system.
# BloodHound CE API authentication
TOKEN=$(curl -s -X POST http://localhost:8080/api/v2/auth/login \
  -H "Content-Type: application/json" \
  -d '{"login_name":"admin","secret":"YourPassword123"}' \
  | jq -r '.data.session_token')

echo "Token: $TOKEN"
#!/usr/bin/env python3
"""
BloodHound CE Weekly Defensive Report
Run every Monday morning: cron 0 8 * * 1
"""
import requests
import json
from datetime import datetime, timedelta

BHCE_URL = "http://localhost:8080"
USERNAME = "svc_reporting"
PASSWORD = "SecureP@ss!"

def get_token():
    r = requests.post(f"{BHCE_URL}/api/v2/auth/login",
                      json={"login_name": USERNAME, "secret": PASSWORD})
    return r.json()["data"]["session_token"]

def run_cypher(token, query):
    headers = {"Authorization": f"Bearer {token}",
               "Content-Type": "application/json"}
    r = requests.post(f"{BHCE_URL}/api/v2/graphs/cypher",
                      headers=headers,
                      json={"query": query})
    return r.json()

def generate_weekly_report():
    token = get_token()
    report = {
        "date": datetime.now().isoformat(),
        "findings": {}
    }

    # Shortest paths to DA
    da_paths = run_cypher(token, """
        MATCH p=shortestPath(
          (u:User {enabled:true})-[*1..10]->
          (g:Group {name:"DOMAIN ADMINS@CORP.LOCAL"})
        )
        RETURN u.name, length(p) as hops
        ORDER BY hops ASC LIMIT 20
    """)
    report["findings"]["shortest_paths_to_da"] = da_paths

    # DCSync rights
    dcsync = run_cypher(token, """
        MATCH (n)-[:DCSync]->(d:Domain)
        WHERE NOT (n:Computer AND n.name CONTAINS 'DC')
        RETURN n.name, labels(n)
    """)
    report["findings"]["dcsync_accounts"] = dcsync

    # Stale admins
    stale = run_cypher(token, f"""
        MATCH (u:User {admincount:true, enabled:true})
        WHERE u.lastlogontimestamp < {int((datetime.now() - timedelta(days=90)).timestamp())}
        RETURN u.name, u.lastlogontimestamp
        ORDER BY u.lastlogontimestamp ASC
    """)
    report["findings"]["stale_admins"] = stale

    # Save report
    filename = f"bhce_report_{datetime.now().strftime('%Y%m%d')}.json"
    with open(filename, 'w') as f:
        json.dump(report, f, indent=2)

    print(f"[+] Report saved: {filename}")
    return report

if __name__ == "__main__":
    report = generate_weekly_report()

    # Alert on critical findings
    if report["findings"]["dcsync_accounts"].get("data", {}).get("nodes"):
        print("[!] CRITICAL: Unauthorized DCSync accounts detected!")
        # Send email/Slack/Teams notification
Delta Analysis — Week-over-Week Changes:
def compare_reports(old_report, new_report):
    """Detect new attack paths compared to the previous week"""
    old_users = set(
        item["u.name"]
        for item in old_report["findings"]["shortest_paths_to_da"].get("data", {}).get("nodes", [])
    )
    new_users = set(
        item["u.name"]
        for item in new_report["findings"]["shortest_paths_to_da"].get("data", {}).get("nodes", [])
    )

    new_exposures = new_users - old_users
    fixed_paths = old_users - new_users

    if new_exposures:
        print(f"[!] NEW EXPOSED ACCOUNTS: {new_exposures}")
    if fixed_paths:
        print(f"[+] REMEDIATED ACCOUNTS: {fixed_paths}")
Defensive Investment Priorities
Regardless of what BloodHound findings reveal, the following foundational security controls should be present in every AD environment:
1. Tier 0 Isolation
- Separate OU structure for DCs, CAs, and ADFS
- PAW (Privileged Access Workstation): Dedicated, hardened workstations for Tier 0 management
- Separate credentials for admin accounts (
jsmith≠DA-jsmith) - JIT (Just-In-Time) access: Admin rights only when needed, with time limits
2. MFA for All Admin Accounts
- Azure AD MFA or Microsoft Authenticator
- Smart card / Windows Hello for Business (FIDO2)
- Phishing-resistant MFA preferred
- Conditional Access — restrict by location and device compliance
3. LAPS Deployment
- Windows LAPS (built into Windows 11 / Server 2022)
- Legacy Windows: Microsoft LAPS MSI
- Every workstation and server — DCs excluded
- Password rotation: 24 hours (workstations), 48 hours (servers)
- Restrict LAPS password read access to privileged groups only
4. SMB Signing Enforcement
# GPO: Computer Configuration → Windows Settings →
# Security Settings → Local Policies → Security Options
# "Microsoft network server: Digitally sign communications (always)" = Enabled
# "Microsoft network client: Digitally sign communications (always)" = Enabled
5. Protected Users Group
- All Tier 0 accounts should be Protected Users members
- Effects: removes RC4, blocks delegation, removes NTLM, shortens TGT lifetime
- Warning: Some legacy applications require NTLM — test before deploying!
6. Credential Guard
# Enable Credential Guard (requires UEFI + Secure Boot)
# GPO: Computer Config → Admin Templates → System → Device Guard
# "Turn On Virtualization Based Security" = Enabled
# "Credential Guard Configuration" = Enabled with UEFI lock

# Verify via PowerShell
(Get-ComputerInfo).DeviceGuardSecurityServicesRunning
7. Weekly BloodHound Analysis
- SharpHound collection: Automated every Sunday night
- Delta analysis: Are there new paths?
- Create tickets: Jira/ServiceNow for prioritized findings
- Track metrics: Average path length trend across the domain over time
8. Audit Logging (Event Monitoring)
# DCSync attempt detection — Event ID 4662
# DS-Replication-Get-Changes-All access attempt
# SIEM rule: Event 4662 + AccessMask = 0x100 or 0x10

# AdminSDHolder modification detection — Event ID 5136
# SIEM rule: 5136 + ObjectClass = ms-DS-Admin-Count

# Unauthorized ACL change — Event IDs 5136, 4670
# Kerberoast attempt — Event ID 4769 + TicketOptions 0x40810000

# Enable Advanced Audit via GPO
# Computer Config → Windows Settings → Security Settings → Advanced Audit Policy
# Account Logon: Kerberos Service Ticket Operations = Success, Failure
# DS Access: Directory Service Changes = Success
# Logon/Logoff: Special Logon = Success
References and Further Reading
Primary Sources:
- Andy Robbins, Rohan Vazarkar, Will Schroeder — BloodHound (2016) and all subsequent research
- SpecterOps — Attack Path Management methodology and BloodHound CE
- GitHub:
github.com/SpecterOps/BloodHound(Apache 2.0)
Academic and Technical References:
- Microsoft ESAE (Enhanced Security Admin Environment) — Retired; succeeded by the Enterprise Access Model
- Microsoft Enterprise Access Model — Current reference for tiered administration
- "Certified Pre-Owned" — Will Schroeder, Lee Christensen (ADCS attacks, 2021)
- "The Dog Whisperer's Handbook" — harmj0y (BloodHound usage guide)
- "An Ace Up the Sleeve" — Andy Robbins, Will Schroeder (ACL attacks)
- "Not a Security Boundary" — Andy Robbins (forest trust attacks)
- "Kerberoasting Without Mimikatz" — Tim Medin (original Kerberoasting technique)
Tools Referenced:
- SharpHound:
github.com/SpecterOps/SharpHound - BloodHound.py:
github.com/dirkjanm/BloodHound.py - PowerView:
github.com/PowerShellMafia/PowerSploit - Impacket:
github.com/fortra/impacket(DCSync, AS-REP roasting, Kerberoasting) - Certipy:
github.com/ly4k/Certipy(ADCS attack and analysis) - ADACLScanner:
github.com/canix1/ADACLScanner(ACL audit reporting) - PingCastle:
pingcastle.com(AD risk assessment — complementary to BloodHound)
Giriş: Saldırganın Haritasını Savunmacı Kullanmak
2016 yılında Andy Robbins, Rohan Vazarkar ve Will Schroeder DEF CON'da BloodHound'u tanıttığında, seyirci salonundan yükselen tepki karışıktı: kırmızı takım üyeleri sevinirken, birçok sistem yöneticisi bunun ne kadar tehlikeli olduğunu anlamakta zorlandı. BloodHound, Active Directory ortamlarındaki ilişkileri bir grafik veritabanında modelleyen ve bu grafik üzerinde en kısa saldırı yollarını hesaplayan açık kaynaklı bir araçtı. Bir saldırgan, etki alanında herhangi bir standart kullanıcı hesabına sahip olsa bile Domain Admin'e giden yolu otomatik olarak bulabiliyordu.
Bugün tablo farklı. SpecterOps, BloodHound'u Attack Path Management (APM) kavramına dönüştürdü: artık bu araç yalnızca saldırganların kullandığı bir keşif silahı değil, blue team'lerin sürekli olarak AD güvenlik duruşunu ölçtüğü bir savunma platformudur. BloodHound Community Edition (CE), bu yeni nesil yaklaşımın ücretsiz, açık kaynak halidir.
Bu yazıda BloodHound CE'yi defensif bir perspektiften inceleyeceğiz: kurulumdan veri toplama metodolojisine, tier model implementasyonundan özel Cypher sorgularına, saldırı yolu önceliklendirmesinden sistematik iyileştirme iş akışına kadar her adımı derinlemesine ele alacağız. Amaç, organizasyonunuzun Active Directory ortamını bir saldırganın gözüyle görerek, o saldırgan harekete geçmeden önce kritik güvenlik açıklarını kapatmaktır.
BloodHound CE vs. Legacy BloodHound: Ne Değişti?
BloodHound tarihsel olarak üç farklı ürüne evrildi. Bu ayrımı anlamak, doğru aracı seçmek için kritiktir.
Legacy BloodHound (v4 ve öncesi)
Orijinal BloodHound, Electron tabanlı bir masaüstü uygulamasıydı. Tek kullanıcılıydı, Neo4j doğrudan yerel makinede çalışırdı. Kurulumu zahmetliydi ve özellikle Windows dışı platformlarda ciddi sorunlar yaşatırdı. Hâlâ çalışan ve belirli kullanım senaryoları için yeterli olan bu sürüm, büyük kurumsal ortamlar için artık önerilmemektedir.
BloodHound CE (Community Edition — v5+)
Modern BloodHound tamamen yeniden yazıldı. React tabanlı web arayüzü, Docker Compose ile saniyeler içinde ayağa kalkan servisler, çok kullanıcılı erişim desteği (RBAC), REST API ve iki veritabanı katmanı (PostgreSQL + Neo4j) ile gelir. Kurulum tek bir komut, erişim herhangi bir tarayıcıdan. BloodHound CE, GitHub üzerinde Apache 2.0 lisansıyla dağıtılmaktadır.
BloodHound Enterprise (BHE)
SpecterOps'un ticari ürünüdür. CE'nin tüm özelliklerine ek olarak sürekli Attack Path Management, otomatik raporlama, tenant-based çoklu orman desteği, Tier Zero asset yönetimi ve SIEM entegrasyonları sunar. Büyük kurumsal ortamlar için tasarlanmıştır; fiyatlandırma lisans bazındadır.
SharpHound vs BloodHound.py: Veri Toplayıcılar
- SharpHound (.NET): Resmi kolektör. Windows'tan çalışır, domain-joined makine gerektirmez (uzaktan da kullanılabilir), en kapsamlı veri setini üretir. Tüm koleksiyon metodlarını destekler: ACL, Session, LoggedOn, ObjectProps, Trusts, Container, CertServices, GPOLocalGroup.
- BloodHound.py (Python): Topluluk destekli, Linux/macOS'tan çalışır. Ağ erişimi ve geçerli domain kimlik bilgileri yeterlidir. Domain-joined makine gerekmez. LDAP+Kerberos üzerinden çalışır; SharpHound'a kıyasla bazı koleksiyon metodları eksik veya daha yavaş olabilir.
BloodHound CE Kurulum
BloodHound CE'nin en hızlı yolu Docker Compose'dur. Production ortamlarda ayrı bir analiz makinesi (jump host veya güvenli iş istasyonu) kullanmanız önerilir.
# Tek komutla kurulum — Docker ve Docker Compose gerekli
curl -L https://ghst.ly/getbhce | docker compose -f - up

# Arka planda çalıştır
curl -L https://ghst.ly/getbhce | docker compose -f - up -d

# Varsayılan URL: http://localhost:8080
# İlk giriş şifresi Docker log çıktısında gösterilir:
docker logs bloodhound-ce_bloodhound_1 2>&1 | grep "Initial Password"
Kurulum tamamlandığında BloodHound CE üç konteyner çalıştırır:
bloodhound: Ana BloodHound uygulaması (Go backend + React frontend)graph-db: Neo4j 4.4 (Cypher sorgu motoru)app-db: PostgreSQL (kullanıcı yönetimi, uygulama verisi)
İlk girişte şifreyi değiştirin ve analiz için bir domain kullanıcısı ya da API token oluşturun.
Güvenli Kurulum Notları:
# Production'da 0.0.0.0 yerine localhost'a bağla
# docker-compose.yml'de:
# ports:
#   - "127.0.0.1:8080:8080"

# TLS için önünde nginx reverse proxy kullanın
# Koleksiyon sırasında uç noktayı VPN arkasında tutun
SharpHound ile Veri Toplama
Veri toplama, tüm analizin temelidir. SharpHound'un ne topladığını ve nasıl çalıştırıldığını anlamak, hem doğru analiz için hem de koleksiyonun yarattığı ağ gürültüsünü değerlendirmek için kritiktir.
Temel Koleksiyon Metodları:
# Tüm veriyi topla (en kapsamlı, en gürültülü)
.\SharpHound.exe -c All --zipfilename corp_bhdata.zip

# Sadece DC'lerden topla — çok daha az gürültülü, hızlı
.\SharpHound.exe -c DCOnly

# Yalnızca ACL ve grup bilgisi (oturum verisi olmadan)
.\SharpHound.exe -c ACL,Group,ObjectProps,Container

# Session verisi — hangi kullanıcı hangi makinede oturum açmış
# Bu koleksiyon lokal admin hakları gerektirir (SMB üzerinden)
.\SharpHound.exe -c Session,LoggedOn --computermaxconn 5

# Belirli OU hedefle (büyük ortamlarda parçalı koleksiyon)
.\SharpHound.exe -c All --searchbase "OU=Workstations,DC=corp,DC=local"

# ADCS verisi (sertifika şablonları, CA'lar)
.\SharpHound.exe -c CertServices

# Uzak domain koleksiyonu (domain-joined olmayan makineden)
.\SharpHound.exe -c All -d corp.local --ldapusername jdoe --ldappassword 'P@ssw0rd'
# Linux'tan uzak koleksiyon (BloodHound.py)
pip3 install bloodhound
python3 bloodhound.py \
  -u jdoe \
  -p 'Password123' \
  -d corp.local \
  -dc dc01.corp.local \
  -c all \
  --zip \
  --dns-tcp

# Kerberos kimlik doğrulama ile (Pass-the-Hash veya PKINIT)
python3 bloodhound.py \
  -u jdoe@corp.local \
  --hashes :aad3b435b51404eeaad3b435b51404ee:31d6cfe0d16ae931b73c59d7e0c089c0 \
  -d corp.local \
  -dc dc01.corp.local \
  -c all \
  --zip
Koleksiyon Güvenliği ve Gürültü Yönetimi:
BloodHound koleksiyonu domain ortamında iz bırakır. Blue team olarak kendi koleksiyonunuzu yetkilendirdiğiniz bir zaman penceresi belirleyin:
Sessionkoleksiyonu: Her hedefe SMB bağlantısı açar. IDS/IPS tarafından yakalanabilir.LoggedOnkoleksiyonu: Uzak registry (RemoteRegistry servisi) gerektirir, etkinleştirilmemiş sistemlerde çalışmaz.ACLkoleksiyonu: LDAP üzerinden çalışır, neredeyse sessizdir. Tercih edilir başlangıç noktası.- Koleksiyon için hizmet hesabı oluşturun:
svc_bloodhound. Minimum haklar: domain user + RemoteRegistry okuma.
Tier Model (Katmanlı Yönetim Modeli)
BloodHound verisi ne kadar zengin olursa olsun, bir bağlam olmadan anlamsızdır. Bu bağlam Tier Modeldir — Microsoft'un ESAE (Enhanced Security Admin Environment) ve PAW (Privileged Access Workstations) çerçevesine dayanan kimlik bilgisi izolasyon mimarisi.
Tier 0 — Kontrol Düzlemi (Control Plane)
Tier 0, kimlik düzlemini kontrol eden varlıkları kapsar. Bu tier'ın güvenliği ihlal edilirse organizasyonun tüm dijital varlıkları tehlike altındadır.
Tier 0 varlıkları:
- Domain Controllers (tüm DC'ler, RODC dahil)
- Enterprise CA sunucuları (ADCS PKI altyapısı)
- ADFS sunucuları (federation ve token imzalama)
- Azure AD Connect / AAD Sync (kimlik senkronizasyonu, hash sync içerir)
- Tier 0'ı yöneten yedekleme sistemleri (Veeam, Backup Exec — AD aware)
- Domain Admins, Enterprise Admins, Schema Admins grupları
- Tier 0 PAW'ları (bu varlıkları yöneten ayrıcalıklı erişim iş istasyonları)
Tier 1 — Sunucu Katmanı
Kurumsal uygulamalar, veritabanları ve altyapı servisleri. Tier 0 kimlik bilgileri bu tier'da asla kullanılmaz.
Tier 1 varlıkları:
- Uygulama sunucuları (IIS, Tomcat, JBoss)
- Veritabanı sunucuları (SQL Server, Oracle)
- Dosya sunucuları (DFS, SMB paylaşımları)
- Exchange / mail sunucuları (Exchange WriteDACL riski özellikle önemli)
- SCCM / Intune yönetim sunucuları
- Tier 1 servis hesapları
Tier 2 — Kullanıcı Katmanı
İnternet'e en çok maruz kalan, phishing ve başlangıç erişim saldırıları için birincil hedef tier.
Tier 2 varlıkları:
- Kullanıcı workstationları ve laptoplar
- Sanal masaüstleri (VDI)
- Helpdesk hesapları (Tier 2 sınırı içinde tutulmalı)
- Standart domain kullanıcıları
BloodHound ile Tier İhlallerini Tespit Etme:
Tier model uygulamadan önce mevcut ihlalleri tespit etmelisiniz. BloodHound bu konuda son derece değerlidir:
// Tier 2 kullanıcısından Tier 0 varlığına herhangi bir yol
// (Önce node'lara tier property ekleyin — BH custom properties veya dış etiketleme)
MATCH p=shortestPath(
  (u:User {enabled:true})
  -[*1..8]->
  (t:Computer)
)
WHERE t.name IN ['DC01.CORP.LOCAL', 'CA01.CORP.LOCAL', 'ADFSRV01.CORP.LOCAL']
AND NOT u.name STARTS WITH 'CORP\\DA-'
RETURN u.name, t.name, length(p) as Hops
ORDER BY Hops ASC

// Servis hesabı Tier 0 grubunda mı?
MATCH (u:User)-[:MemberOf*1..]->(g:Group)
WHERE g.name =~ '(?i).*(domain admins|enterprise admins|schema admins).*'
AND u.name =~ '(?i).*(svc_|service_|sa_).*'
RETURN u.name, g.name
Kritik Saldırı Yolu Türleri ve Tespiti
BloodHound'un güçlü olduğu birkaç kritik saldırı kategorisi vardır. Her birini, nasıl tespit edileceğini ve nasıl iyileştirileceğini tek tek ele alalım.
1. Kerberoasting Yolları
Kerberoasting, SPN (Service Principal Name) kayıtlı hesapların TGS biletlerini çevrimdışı kırmaya dayanan bir saldırıdır. BloodHound'da hasspn:true özelliğiyle sorgulanır.
Risk faktörleri:
- Hesap admincount:true ise — doğrudan Domain Admin yolu
- Şifre son değiştirilme tarihi eski ise — zayıf şifre olasılığı yüksek
- RC4 şifreleme destekleniyorsa — modern GPU'larla çok hızlı kırılır
- Hesap son giriş tarihi eski ise — sahipsiz hesap
// Kerberoastable hesaplar ve DA'ya uzaklıkları
MATCH (u:User {hasspn:true, enabled:true})
OPTIONAL MATCH p=shortestPath(
  (u)-[*1..10]->
  (g:Group {name:"DOMAIN ADMINS@CORP.LOCAL"})
)
RETURN u.name,
       u.serviceprincipalnames,
       u.pwdlastset,
       u.admincount,
       length(p) as HopsToDA
ORDER BY HopsToDA ASC NULLS LAST

// Yüksek değerli Kerberoastable hesaplar (DA yolunda)
MATCH (u:User {hasspn:true, enabled:true, admincount:true})
RETURN u.name,
       u.serviceprincipalnames,
       datetime({epochSeconds: toInteger(u.pwdlastset)}) as PasswordLastSet
İyileştirme öncelikleri:
- Tüm Kerberoastable admin hesapları → gMSA (Group Managed Service Account) ile değiştir
- gMSA mümkün değilse: AES256 şifreleme zorla, 25+ karakter şifre, 180 günde bir rotasyon
- Hesabı Protected Users grubuna al (RC4 kaldırır, TGS süresi kısalır)
2. AS-REP Roasting
Kerberos ön kimlik doğrulaması devre dışı bırakılmış hesaplar, herhangi bir kimlik doğrulaması olmadan şifreli yanıt alabilir — bu yanıt çevrimdışı kırılabilir.
// AS-REP Roastable hesaplar ve etkileri
MATCH (u:User {dontreqpreauth:true, enabled:true})
OPTIONAL MATCH p=shortestPath(
  (u)-[*1..10]->
  (g:Group {name:"DOMAIN ADMINS@CORP.LOCAL"})
)
RETURN u.name,
       u.admincount,
       u.description,
       length(p) as HopsToDA
ORDER BY u.admincount DESC, HopsToDA ASC

// AS-REP Roastable + son 90 günde aktif
MATCH (u:User {dontreqpreauth:true, enabled:true})
WHERE u.lastlogontimestamp > (timestamp()/1000 - 7776000)
RETURN u.name, u.lastlogontimestamp, u.admincount
İyileştirme: Tüm hesaplar için Kerberos ön kimlik doğrulamasını etkinleştirin. Bu seçenek genellikle UNIX/Linux sistemlerin eski sürümlerini desteklemek için devre dışı bırakılmıştır — modern Kerberos istemcileri bunu destekler.
3. Unconstrained Delegation
Unconstrained delegation yapılandırılmış bir bilgisayara herhangi bir kullanıcı bağlandığında, o kullanıcının TGT'si bilgisayar belleğinde (LSASS) saklanır. Saldırgan bu bilgisayarı ele geçirirse ve PrintSpooler (MS-RPRN) gibi coercion saldırılarıyla DC'yi bu bilgisayara bağlatabilirse, DC'nin TGT'sini çalabilir — bu tam domain compromise anlamına gelir.
// Unconstrained delegation bilgisayarlar (DC'ler hariç)
MATCH (c:Computer {unconstraineddelegation:true, enabled:true})
WHERE NOT c.name CONTAINS 'DC'
RETURN c.name,
       c.operatingsystem,
       c.lastlogontimestamp,
       c.haslaps
ORDER BY c.name

// Bu bilgisayarlara lokal admin olan kullanıcılar
MATCH (u:User)-[:AdminTo]->(c:Computer {unconstraineddelegation:true, enabled:true})
WHERE NOT c.name CONTAINS 'DC'
RETURN u.name, c.name, u.enabled
İyileştirme seçenekleri:
- Unconstrained delegation'ı tamamen devre dışı bırak
- Resource-Based Constrained Delegation (RBCD) ile değiştir
- Bilgisayarı Protected Users grubuna ekle (delegation engellenir)
- "Account is sensitive and cannot be delegated" bayrağını set et (hesap bazında)
- DC'de PrintSpooler servisi devre dışı bırak (coercion engeli)
4. DCSync Hakları
DCSync, Domain Controller'ı taklit ederek tüm domain'in hash'lerini çeken bir saldırı tekniğidir. Bir hesabın bunu yapabilmesi için AD'de özel replikasyon izinleri (DS-Replication-Get-Changes-All) olması gerekir. Bu izin sadece DC bilgisayar hesaplarında ve bazı özel servis hesaplarında (MSOL_, AZURE_) olmalıdır.
// DCSync hakları olan tüm principal'lar
MATCH p=(n)-[:DCSync]->(d:Domain)
RETURN n.name, n.objectid, labels(n) as NodeType

// DC bilgisayarları hariç tut — bunlar meşru
MATCH p=(n)-[:DCSync]->(d:Domain)
WHERE NOT (n:Computer AND (
  n.name CONTAINS 'DC'
  OR n.name CONTAINS 'DOMAINCTRL'
))
RETURN n.name, labels(n) as NodeType, n.objectid

// DCSync + Domain Admin olmayan hesaplar
MATCH (n)-[:DCSync]->(d:Domain)
WHERE NOT EXISTS {
  MATCH (n)-[:MemberOf*..]->(g:Group {name:"DOMAIN ADMINS@CORP.LOCAL"})
}
RETURN n.name, labels(n)
İyileştirme: Azure AD Connect ve ADFS servis hesapları dışında hiçbir hesapta DCSync hakkı olmamalıdır. Yetkisiz DCSync hakları için hemen kaldırın ve son 30 günlük NTDS audit loglarını inceleyin.
5. LAPS Olmayan Bilgisayarlar
LAPS (Local Administrator Password Solution), her workstation'ın lokal Administrator şifresini otomatik olarak döndürür ve AD'de şifrelenmiş olarak depolar. LAPS olmayan ortamlarda tüm workstation'lar aynı lokal admin şifresine sahip olabilir — bir makineyi ele geçirmek tüm ağa pivot imkânı verir.
// LAPS olmayan aktif bilgisayarlar
MATCH (c:Computer {enabled:true})
WHERE c.haslaps = false
RETURN c.name,
       c.operatingsystem,
       c.lastlogontimestamp
ORDER BY c.lastlogontimestamp DESC NULLS LAST

// LAPS oranı (yüzde)
MATCH (c:Computer {enabled:true})
WITH count(c) as total
MATCH (c:Computer {enabled:true, haslaps:true})
RETURN count(c) as WithLAPS, total, (count(c)*100/total) as Percentage

// İşletim sistemine göre LAPS durumu
MATCH (c:Computer {enabled:true})
RETURN c.operatingsystem,
       count(c) as Total,
       sum(CASE WHEN c.haslaps THEN 1 ELSE 0 END) as WithLAPS
ORDER BY c.operatingsystem
Defensif Cypher Sorguları — Tam Kütüphane
Aşağıda blue team'lerin BloodHound CE'de düzenli olarak çalıştırması gereken sekiz temel sorgu kategorisi detaylandırılmıştır.
Sorgu 1: Domain Admin'e En Kısa Yollar
// Tüm etkin kullanıcılardan DA'ya en kısa yol (ilk 20)
MATCH p=shortestPath(
  (u:User {enabled:true})
  -[*1..10]->
  (g:Group {name:"DOMAIN ADMINS@CORP.LOCAL"})
)
WHERE NOT u.name STARTS WITH 'CORP\\DA-'
RETURN u.name, length(p) as PathLength
ORDER BY PathLength ASC
LIMIT 20

// En kısa yol uzunluğu dağılımı (kaç kullanıcı kaç adımda)
MATCH p=shortestPath(
  (u:User {enabled:true})
  -[*1..10]->
  (g:Group {name:"DOMAIN ADMINS@CORP.LOCAL"})
)
WITH length(p) as hops, count(u) as UserCount
RETURN hops, UserCount
ORDER BY hops ASC
Sorgu 2: DCSync Hakları
// DCSync haklarını tam olarak göster
MATCH p=(n)-[:DCSync]->(d:Domain)
WHERE NOT (n:Computer AND n.name CONTAINS 'DC')
RETURN n.name,
       n.objectid,
       labels(n) as NodeType,
       d.name as Domain
ORDER BY n.name
Sorgu 3: Unconstrained Delegation Bilgisayarlar
// Unconstrained delegation + LAPS durumu + son aktiflik
MATCH (c:Computer {unconstraineddelegation:true, enabled:true})
WHERE NOT c.name CONTAINS 'DC'
RETURN c.name,
       c.operatingsystem,
       c.haslaps,
       datetime({epochSeconds: toInteger(c.lastlogontimestamp)}) as LastSeen
ORDER BY c.lastlogontimestamp DESC NULLS LAST
Sorgu 4: Kerberoastable Hesaplar (Tier 2'den Ulaşılabilir)
// Tier 2 kullanıcısından ulaşılabilir Kerberoastable hesaplar
MATCH p=shortestPath(
  (u:User {enabled:true})
  -[*1..5]->
  (k:User {hasspn:true, enabled:true})
)
WHERE NOT u.admincount
RETURN u.name as SourceUser,
       k.name as KerberoastableTarget,
       k.serviceprincipalnames as SPNs,
       length(p) as Hops
ORDER BY Hops ASC
LIMIT 50
Sorgu 5: Kullanılmayan Admin Hesapları (90+ gün)
// 90 gün boyunca kullanılmayan admincount hesapları
MATCH (u:User {admincount:true, enabled:true})
WHERE u.lastlogontimestamp < (timestamp() / 1000 - 7776000)
RETURN u.name,
       u.description,
       datetime({epochSeconds: toInteger(u.lastlogontimestamp)}) as LastLogon,
       datetime({epochSeconds: toInteger(u.pwdlastset)}) as PasswordLastSet
ORDER BY u.lastlogontimestamp ASC

// Hiç giriş yapmamış admin hesapları
MATCH (u:User {admincount:true, enabled:true})
WHERE u.lastlogontimestamp <= 0 OR u.lastlogontimestamp IS NULL
RETURN u.name, u.description, u.whencreated
Sorgu 6: LAPS Olmayan Bilgisayarlar
// LAPS eksik, aktif, domain-joined bilgisayarlar
MATCH (c:Computer {enabled:true})
WHERE c.haslaps = false
RETURN c.name,
       c.operatingsystem,
       datetime({epochSeconds: toInteger(c.lastlogontimestamp)}) as LastSeen
ORDER BY c.operatingsystem, c.name
Sorgu 7: AS-REP Roastable Hesaplar
// Kerberos ön auth devre dışı, etkin hesaplar
MATCH (u:User {dontreqpreauth:true, enabled:true})
OPTIONAL MATCH p=shortestPath(
  (u)-[*1..10]->
  (g:Group {name:"DOMAIN ADMINS@CORP.LOCAL"})
)
RETURN u.name,
       u.admincount,
       u.description,
       length(p) as HopsToDA
ORDER BY HopsToDA ASC NULLS LAST
Sorgu 8: AdminSDHolder Dışı GenericAll Yetkisi
// Yüksek değerli hedeflere sahip, düşük ayrıcalıklı hesaplar
MATCH (u:User {enabled:true})-[:GenericAll|GenericWrite]->(t)
WHERE NOT u.admincount
AND (t:Group OR t:Computer OR t:User)
AND (t.highvalue OR t.admincount)
RETURN u.name as Attacker,
       t.name as HighValueTarget,
       labels(t) as TargetType
ORDER BY u.name
Bonus — Shadow Credentials (msDS-KeyCredentialLink):
// GenericWrite/GenericAll → msDS-KeyCredentialLink manipülasyonu
MATCH (u:User {enabled:true})-[r:GenericWrite|GenericAll|WriteAccountRestrictions]->(t:User|Computer)
WHERE NOT u.admincount
RETURN u.name as Source,
       t.name as Target,
       type(r) as EdgeType,
       t.enabled as TargetEnabled
ORDER BY u.name
Bonus — ADCS ESC Yolları:
// Sertifika şablonu aracılığıyla DC'ye yol
MATCH p=(u:User {enabled:true})
  -[:Enroll|GenericAll|GenericWrite]->
  (ct:CertTemplate)
  -[:PublishedTo]->
  (ca:EnterpriseCA)
WHERE ct.enrolleeSuppliesSubject = true
OR ct.authenticationenabled = true
RETURN u.name, ct.name, ca.name, ct.enrolleeSuppliesSubject

// ADCS ESC1: Herhangi bir kullanıcı enroll edebilir + EKU authentication
MATCH (ct:CertTemplate)
WHERE ct.enrolleeSuppliesSubject = true
AND ct.authenticationenabled = true
AND ct.requiresmanagerapproval = false
RETURN ct.name, ct.oid
Saldırı Yolu Önceliklendirme
Büyük organizasyonlarda yüzlerce saldırı yolu bulunabilir. Hepsini aynı anda düzeltmek mümkün değildir. Önceliklendirme için sistematik bir yaklaşım gerekir.
Risk Skoru Hesaplama:
Risk skoru = Etki × Olasılık × Exposure
- Etki (1-5): Yol nereye götürüyor? Tier 0'a mı (5), Tier 1'e mi (3), Tier 2'ye mi (1)?
- Olasılık (1-5): Yol uzunluğu. 1-2 hop (5), 3-4 hop (3), 5+ hop (1).
- Exposure (1-3): Başlangıç hesabı internete maruz mu? Helpdesk/VPN/Webmail hesabı (3), internal-only kullanıcı (1).
Önceliklendirme Matrisi:
| Risk Skoru | Aksiyon | SLA |
|---|---|---|
| 60-75 | ACİL — Hemen ele al | 24-48 saat |
| 40-59 | YÜKSEK — Bu sprint | 1 hafta |
| 20-39 | ORTA — Planlı düzeltme | 1 ay |
| 0-19 | DÜŞÜK — Backlog | 3 ay |
// Önceliklendirme verisi: yol uzunluğu + hesap aktifliği + admin durumu
MATCH p=shortestPath(
  (u:User {enabled:true})
  -[*1..10]->
  (g:Group {name:"DOMAIN ADMINS@CORP.LOCAL"})
)
WITH u, length(p) as hops
RETURN u.name,
       hops,
       u.admincount,
       u.lastlogontimestamp,
       CASE
         WHEN hops <= 2 THEN 'CRITICAL'
         WHEN hops <= 4 THEN 'HIGH'
         WHEN hops <= 6 THEN 'MEDIUM'
         ELSE 'LOW'
       END as Priority
ORDER BY hops ASC, u.lastlogontimestamp DESC
LIMIT 100
BloodHound CE Attack Paths Sekmesi:
BloodHound CE v5'in "Attack Paths" sekmesi bu önceliklendirmeyi otomatik olarak yapar. Sekmeye erişim:
- Sol menü → "Explore" yerine "Attack Paths"
- Domain seçin
- Tier Zero varlıklarınızı tanımlayın (özelleştirilebilir)
- "Findings" bölümü otomatik önceliklendirilmiş liste sunar
Saldırı Yolu İyileştirme İş Akışı
Her kenar (edge) türü için spesifik iyileştirme adımları:
GenericAll / GenericWrite → Kaldır
# PowerView ile ACE kaldır
Import-Module PowerView.ps1

# Kimin erişimi var kontrol et
Get-DomainObjectAcl -Identity "SVC_SQL" -ResolveGUIDs |
  Where-Object {$_.ActiveDirectoryRights -match "GenericAll"}

# ACE kaldır
Remove-DomainObjectAcl `
  -TargetIdentity "SVC_SQL" `
  -PrincipalIdentity "jdoe" `
  -Rights All `
  -Verbose

# AD Module ile kaldır (PowerView yerine)
$acl = Get-Acl "AD:\CN=SVC_SQL,OU=ServiceAccounts,DC=corp,DC=local"
# GenericAll ACE'yi bul ve kaldır
$ace = $acl.Access | Where-Object {
  $_.IdentityReference -eq "CORP\jdoe" -and
  $_.ActiveDirectoryRights -match "GenericControl"
}
$acl.RemoveAccessRule($ace)
Set-Acl "AD:\CN=SVC_SQL,OU=ServiceAccounts,DC=corp,DC=local" $acl
MemberOf (Yanlış Grup Üyeliği) → Kaldır
# Hesabı Domain Admins'ten kaldır
Remove-ADGroupMember `
  -Identity "Domain Admins" `
  -Members "SVC_SQL" `
  -Confirm:$false

# Tüm admin grup üyeliklerini kontrol et
Get-ADUser "SVC_SQL" -Properties MemberOf |
  Select-Object -ExpandProperty MemberOf |
  Get-ADGroup |
  Where-Object {$_.AdminCount -eq 1}
Unconstrained Delegation → Kaldır veya Kısıtla
# Unconstrained delegation'ı kaldır
Set-ADComputer "APPSERVER01" `
  -TrustedForDelegation $false

# Constrained delegation ile değiştir
Set-ADComputer "APPSERVER01" `
  -TrustedToAuthForDelegation $true  # Protocol transition
Set-ADComputer "APPSERVER01" `
  -ServicePrincipalNames @{Add="HTTP/webapp.corp.local"}

# Protected Users grubuna ekle (hesap bazında — delegation tamamen engellenir)
Add-ADGroupMember "Protected Users" -Members "APPSERVER01$"
Kerberoastable Hesap → gMSA ile Değiştir
# gMSA oluştur
New-ADServiceAccount `
  -Name "gMSA_SQL" `
  -DNSHostName "sql-srv01.corp.local" `
  -PrincipalsAllowedToRetrieveManagedPassword "SQL-SRV01$" `
  -KerberosEncryptionType AES128,AES256

# SQL Server servisini gMSA ile yapılandır
# SQL Server Configuration Manager → Service Account → NT SERVICE\gMSA_SQL$

# Eski servis hesabını devre dışı bırak
Disable-ADAccount "svc_sql"
HasSession → PAW Uygula
# Tier 0 admin hesaplarının Tier 2 makinelerde oturum açmasını engelle
# Restricted Admin Mode GPO
# Computer Config → Admin Templates → System → Credentials Delegation
# "Restrict delegation of credentials to remote servers" = Enabled

# Protected Users grubuna admin hesapları ekle
Add-ADGroupMember "Protected Users" -Members "DA-jsmith"

# Logon workstations kısıtla (hesap bazında)
Set-ADUser "DA-jsmith" -LogonWorkstations "PAW-01,PAW-02,PAW-03"
BloodHound ile ADCS (Active Directory Certificate Services) Analizi
ADCS, son yıllarda kritik bir saldırı yüzeyi olarak ön plana çıktı. Will Schroeder ve Lee Christensen'ın "Certified Pre-Owned" araştırması, onlarca farklı sertifika şablonu kötüye kullanım senaryosunu belgeledi. BloodHound CE, ADCS ilişkilerini (CertTemplate, EnterpriseCA, IssuedSignedBy) grafik üzerinde modelleyerek bu saldırı yollarını görselleştirir.
ESC1 — Enrollee Supplies Subject + EKU Auth:
// ESC1: Herhangi kullanıcı kendini DC olarak tanıtabilen sertifika alabilir
MATCH (ct:CertTemplate)
WHERE ct.enrolleeSuppliesSubject = true
AND ct.authenticationenabled = true
AND ct.requiresmanagerapproval = false
AND ct.nosecurityextension = false
MATCH (ca:EnterpriseCA)-[:PublishedTo]->(ct)
MATCH (u:User {enabled:true})-[:Enroll|GenericAll|GenericWrite]->(ct)
RETURN u.name, ct.name, ca.name
ORDER BY u.name
ESC4 — Template Overwrite:
// ESC4: Kullanıcı sertifika şablonunu değiştirebilir
MATCH (u:User {enabled:true})-[:GenericAll|GenericWrite|WriteDacl|WriteOwner]->(ct:CertTemplate)
WHERE NOT u.admincount
RETURN u.name, ct.name, u.enabled
ORDER BY u.name
ESC7 — CA Officer/Manager:
// ESC7: CA manage yetkisi — isteğe bağlı sertifika onayı
MATCH (u:User {enabled:true})-[:ManageCertificates|ManageCA]->(ca:EnterpriseCA)
WHERE NOT u.admincount
RETURN u.name, ca.name
ADCS İyileştirme Kontrol Listesi:
# Tüm sertifika şablonlarını listele
certutil -v -template | Select-String "Template Name:"

# ESC1 için: EnrolleesCanRequestCertificates kaldır
# Certificates snap-in (certtmpl.msc):
# Şablon → Özellikler → Konu Adı → "Bu bilgiyi Active Directory'den al" seçin

# Manager approval zorunlu kıl (kritik şablonlar için)
# Şablon → Özellikler → Verme Gereksinimleri → "CA yöneticisinin onayı" = ON

# NTLM relay için HTTP'yi devre dışı bırak (ESC8)
# IIS Authentication → Devre Dışı Bırak: Windows Authentication (NTLM)
# Etkinleştir: HTTPS + FQDN enrollment
Otomatik Raporlama ve Sürekli İzleme
BloodHound CE, REST API sunar. Bu API'yi kullanarak haftalık otomatik raporlama sistemi kurabilirsiniz.
# BloodHound CE API kimlik doğrulama
TOKEN=$(curl -s -X POST http://localhost:8080/api/v2/auth/login \
  -H "Content-Type: application/json" \
  -d '{"login_name":"admin","secret":"YourPassword123"}' \
  | jq -r '.data.session_token')

echo "Token: $TOKEN"
#!/usr/bin/env python3
"""
BloodHound CE Haftalık Defensif Rapor
Her Pazartesi sabahı çalıştırın: cron 0 8 * * 1
"""
import requests
import json
from datetime import datetime, timedelta

BHCE_URL = "http://localhost:8080"
USERNAME = "svc_reporting"
PASSWORD = "SecureP@ss!"

def get_token():
    r = requests.post(f"{BHCE_URL}/api/v2/auth/login",
                      json={"login_name": USERNAME, "secret": PASSWORD})
    return r.json()["data"]["session_token"]

def run_cypher(token, query):
    headers = {"Authorization": f"Bearer {token}",
               "Content-Type": "application/json"}
    r = requests.post(f"{BHCE_URL}/api/v2/graphs/cypher",
                      headers=headers,
                      json={"query": query})
    return r.json()

def generate_weekly_report():
    token = get_token()
    report = {
        "date": datetime.now().isoformat(),
        "findings": {}
    }

    # En kısa yollar
    da_paths = run_cypher(token, """
        MATCH p=shortestPath(
          (u:User {enabled:true})-[*1..10]->
          (g:Group {name:"DOMAIN ADMINS@CORP.LOCAL"})
        )
        RETURN u.name, length(p) as hops
        ORDER BY hops ASC LIMIT 20
    """)
    report["findings"]["shortest_paths_to_da"] = da_paths

    # DCSync hakları
    dcsync = run_cypher(token, """
        MATCH (n)-[:DCSync]->(d:Domain)
        WHERE NOT (n:Computer AND n.name CONTAINS 'DC')
        RETURN n.name, labels(n)
    """)
    report["findings"]["dcsync_accounts"] = dcsync

    # Stale adminler
    stale = run_cypher(token, f"""
        MATCH (u:User {admincount:true, enabled:true})
        WHERE u.lastlogontimestamp < {int((datetime.now() - timedelta(days=90)).timestamp())}
        RETURN u.name, u.lastlogontimestamp
        ORDER BY u.lastlogontimestamp ASC
    """)
    report["findings"]["stale_admins"] = stale

    # Raporu kaydet
    filename = f"bhce_report_{datetime.now().strftime('%Y%m%d')}.json"
    with open(filename, 'w') as f:
        json.dump(report, f, indent=2)

    print(f"[+] Rapor kaydedildi: {filename}")
    return report

if __name__ == "__main__":
    report = generate_weekly_report()

    # Kritik bulgular için uyarı
    if report["findings"]["dcsync_accounts"].get("data", {}).get("nodes"):
        print("[!] KRİTİK: Yetkisiz DCSync hesapları tespit edildi!")
        # E-posta/Slack/Teams bildirimi gönderin
Delta Analizi — Haftadan Haftaya Değişim:
def compare_reports(old_report, new_report):
    """Önceki haftaya göre yeni saldırı yollarını tespit et"""
    old_users = set(
        item["u.name"]
        for item in old_report["findings"]["shortest_paths_to_da"].get("data", {}).get("nodes", [])
    )
    new_users = set(
        item["u.name"]
        for item in new_report["findings"]["shortest_paths_to_da"].get("data", {}).get("nodes", [])
    )

    new_exposures = new_users - old_users
    fixed_paths = old_users - new_users

    if new_exposures:
        print(f"[!] YENİ MARUZ KALAN HESAPLAR: {new_exposures}")
    if fixed_paths:
        print(f"[+] İYİLEŞTİRİLEN HESAPLAR: {fixed_paths}")
Savunma Yatırımı Öncelikleri
BloodHound analizi tamamlandığında, mevcut bulgulara bakılmaksızın şu temel güvenlik kontrolleri her AD ortamında olmalıdır:
1. Tier 0 İzolasyonu
- DC'ler, CA'lar ve ADFS için ayrı OU yapısı
- PAW (Privileged Access Workstation): Tier 0 yönetimi için ayrı, hardened iş istasyonları
- Admin hesapları için ayrı kimlik bilgileri (
jsmith≠DA-jsmith) - JIT (Just-In-Time) erişim: admin hakları sadece gerektiğinde ve süre sınırlı
2. Tüm Admin Hesapları için MFA
- Azure AD MFA veya Microsoft Authenticator
- Smart card / Windows Hello for Business (FIDO2)
- Phishing-resistant MFA tercih edilmeli
- Conditional Access ile konuma ve cihaza göre kısıtlama
3. LAPS Deployment
- Windows LAPS (Windows 11 / Server 2022 dahili)
- Eski Windows: Microsoft LAPS MSI
- Her workstation ve server'a — DC'ler hariç
- Şifre rotasyonu: 24 saat (workstations), 48 saat (servers)
- LAPS şifresine erişimi ayrıcalıklı gruplara sınırlayın
4. SMB Signing Zorunlu
# GPO: Computer Configuration → Windows Settings →
# Security Settings → Local Policies → Security Options
# "Microsoft network server: Digitally sign communications (always)" = Enabled
# "Microsoft network client: Digitally sign communications (always)" = Enabled
5. Protected Users Grubu
- Tüm Tier 0 hesapları Protected Users üyesi olmalı
- Etkiler: RC4 kaldırır, delegation engeller, NTLM kaldırır, TGT süresi kısalır
- Dikkat: Bazı eski uygulamalar NTLM gerektiriyor olabilir — test edin!
6. Credential Guard
# Credential Guard aktifleştir (UEFI + Secure Boot gerekli)
# GPO: Computer Config → Admin Templates → System → Device Guard
# "Turn On Virtualization Based Security" = Enabled
# "Credential Guard Configuration" = Enabled with UEFI lock

# PowerShell ile kontrol
(Get-ComputerInfo).DeviceGuardSecurityServicesRunning
7. Haftalık BloodHound Analizi
- SharpHound koleksiyonu: Her Pazar gecesi otomatik
- Delta analizi: Yeni yollar var mı?
- Ticket oluştur: Öncelikli bulgular için Jira/ServiceNow
- Metrikleri izle: Domain'deki ortalama yol uzunluğu trend analizi
8. Audit Logging (Olay İzleme)
# DCSync attempt detection — Event ID 4662
# DS-Replication-Get-Changes-All erişim girişimi
# SIEM kuralı: Event 4662 + AccessMask = 0x100 veya 0x10

# AdminSDHolder değişiklik tespiti — Event ID 5136
# SIEM kuralı: 5136 + ObjectClass = ms-DS-Admin-Count

# Yetkisiz ACL değişikliği — Event ID 5136, 4670
# Kerberoast girişimi — Event ID 4769 + TicketOptions 0x40810000
Referanslar ve Kaynaklar
Birincil Kaynaklar:
- Andy Robbins, Rohan Vazarkar, Will Schroeder — BloodHound (2016) ve tüm subsequent research
- SpecterOps — Attack Path Management metodolojisi ve BloodHound CE
- GitHub:
github.com/SpecterOps/BloodHound(Apache 2.0)
Akademik ve Teknik Referanslar:
- Microsoft ESAE (Enhanced Security Admin Environment) — Emekli oldu, yerine Enterprise Access Model geçti
- Microsoft Enterprise Access Model — Katmanlı yönetim için güncel rehber
- "Certified Pre-Owned" — Will Schroeder, Lee Christensen (ADCS saldırıları)
- "The Dog Whisperer's Handbook" — harmj0y (BloodHound kullanım rehberi)
- "An Ace Up the Sleeve" — Andy Robbins, Will Schroeder (ACL saldırıları)
- "Not a Security Boundary" — Andy Robbins (forest trust saldırıları)
Araçlar:
- SharpHound:
github.com/SpecterOps/SharpHound - BloodHound.py:
github.com/dirkjanm/BloodHound.py - PowerView:
github.com/PowerShellMafia/PowerSploit - Impacket:
github.com/fortra/impacket(DCSync, AS-REP roasting, Kerberoasting) - Certipy:
github.com/ly4k/Certipy(ADCS saldırı ve analiz)
- Active Directory Security Testing: The Complete Attacker's Perspective
- Kerberos Protocol Internals: Tickets, PAC, and the Security Implications
- AD Certificate Services Deep Dive: ESC1 to ESC8 Attack Paths
- BloodHound CE for Defensive AD Analysis: Attack Path Management
- Windows Credential Access: LSASS, DPAPI, SAM, and Browser Secrets
Frequently Asked Questions
What is BloodHound Community Edition?
BloodHound CE is the free, open-source graph tool from SpecterOps that maps relationships in Active Directory and Azure to reveal attack paths. Defenders use it to find and cut the shortest routes an attacker could take to Domain Admin.
How do blue teams use BloodHound defensively?
By ingesting SharpHound/AzureHound data regularly, prioritizing high-value choke-point edges, implementing a tiered administration model, and tracking attack-path exposure over time as a security metric rather than a one-off audit.
What is Attack Path Management?
A continuous discipline formalized by SpecterOps for identifying, prioritizing and remediating the attack paths that lead to critical assets — focusing on the few high-impact edges that eliminate many paths at once, instead of chasing every misconfiguration.
What are custom Cypher queries used for?
Cypher is BloodHound's graph query language. Blue teams write custom queries to surface risks the default ones miss — such as non-tier-0 principals that control tier-0 objects, shadow admins, or dangerous ACL chains specific to their environment.